DIY seat brackets - completed 02/10/2013

User avatar
carbd7age
Club4AG Pro
Posts: 803
Joined: Sat Jan 12, 2013 5:56 am
Location: Chattanooga, TN

DIY seat brackets - completed 02/10/2013

Postby carbd7age » Sun Jan 20, 2013 11:09 am

I couldn't find a how-to, so here's mine!

Having an SR5 means I'm blessed with flat, unsupportive seats. In fact I actually have trouble staying centered in the seat even sitting still due to lack of bolstering. So a bucket seat is a natural upgrade when the handling limit of the car is whether I can hold onto the steering wheel and stay in the seat.

So a new seat needs it's own mounts since aftermarket seats are universal. You can buy AE86-specific seat mounts, and that's all well and good, if you have a couple hundred bucks to spend. But think about this: what is holding your current seat in? Aha! This is how to disassemble a stock seat to obtain the bracket/slider combo, and save you an asston of money.

Tools you need:
Ratchet, 12mm socket, 14mm socket, Allen head sockets
Allen keys
Little Philips head screwdriver, like a #1
Pliers
Drill and drill bits - nothing bigger than 3/8", so any set will work
Hammer
Big hammer
Punch for knocking out rivets
Center punch for marking holes
Dremel - everything needs a little trimmin lol
Tape measure
Beers


Step 1: remove the seat. 4x 14mm head bolts hold it down. If you need a picture and help with that, do yourself a favor and buy Buddy Club rails.

Step 2: turn the seat upside-down so you can how the sliders work. Mess with the levers so you understand how it works and how it all works together.
Image

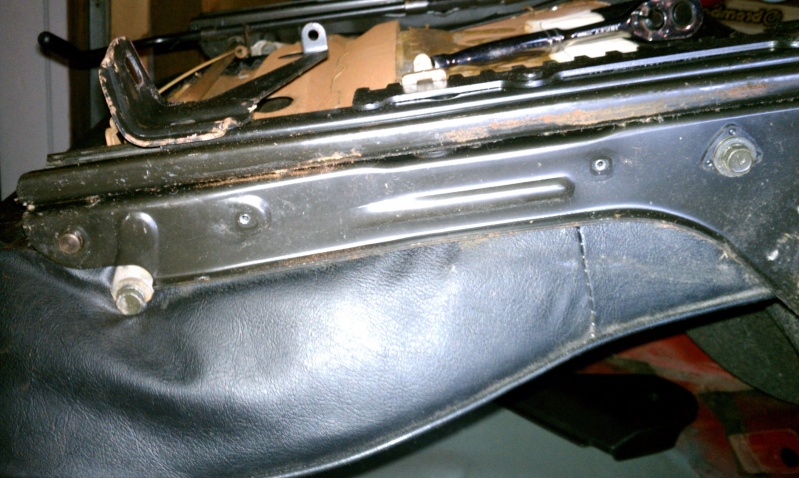
Step 3: remove all the side stuff. There are a handful of tiny Philips screws that hold the two plastic side covers on. The knob on the left side is held in with a spring clip. It'll shoot off and knock a little hole in your drink cup if you're not careful. Underneath those covers are 2x 12mm bolts on each side. Take them out, these 4 bolts hold the butt cushion to the frame.
Image

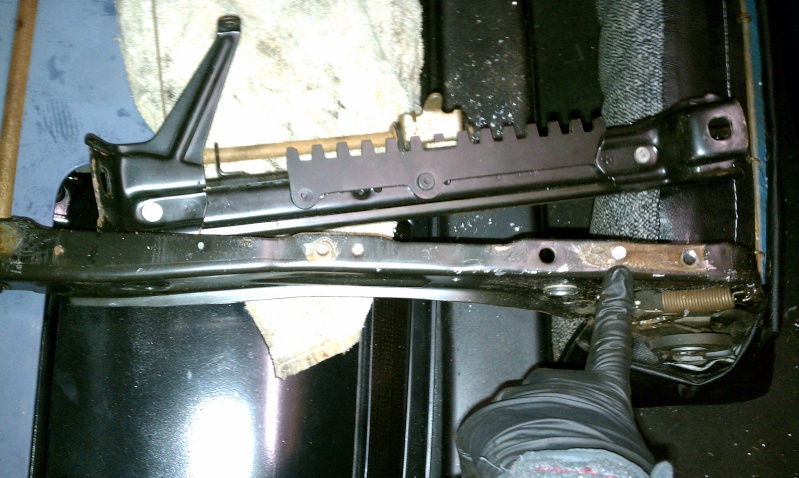
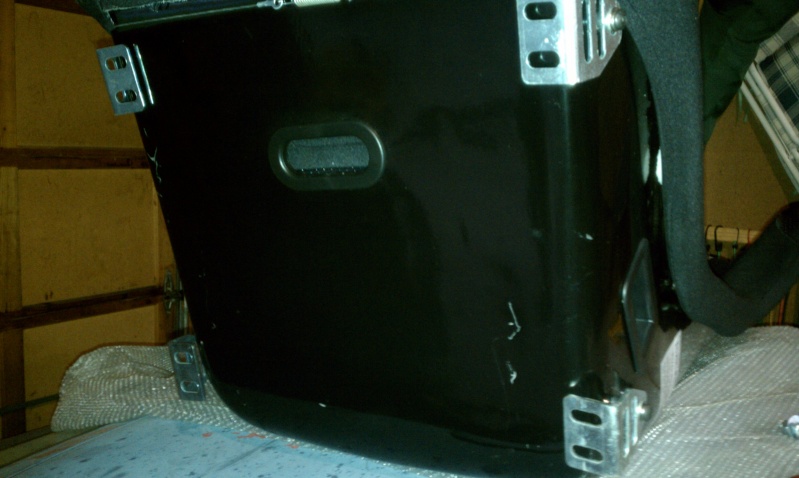
Step 4: drill out the 6 rivets that attach the seat frame to the seat sliders. There are 3 per side, plus a special hidden spot weld on each side towards the back. I used a 1/8" drill bit for a pilot hole, then a 3/8" bit to rip the heads of the rivets. A hammer and punch will knock out the rest of the rivet. I used a broken screw driver and pry bar to separate the sliders from the frame. I'm pointing at the surprising spot weld I'm this picture, you can see the 3 holes drilled out and the slider separate from the frame.
Image

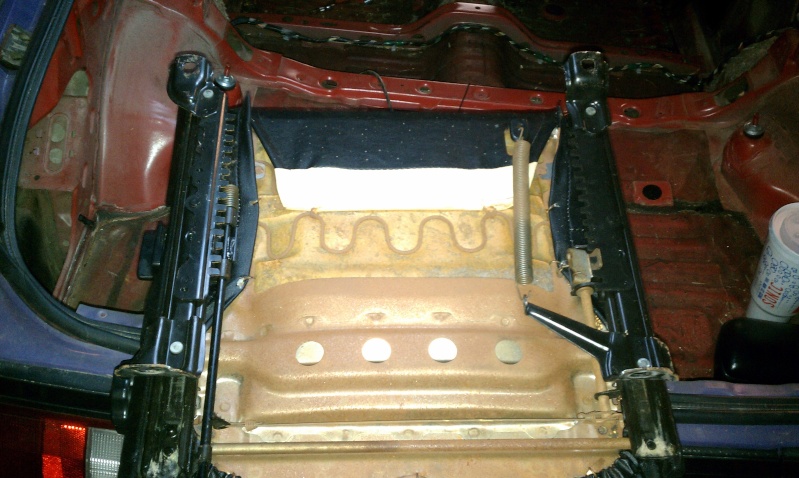
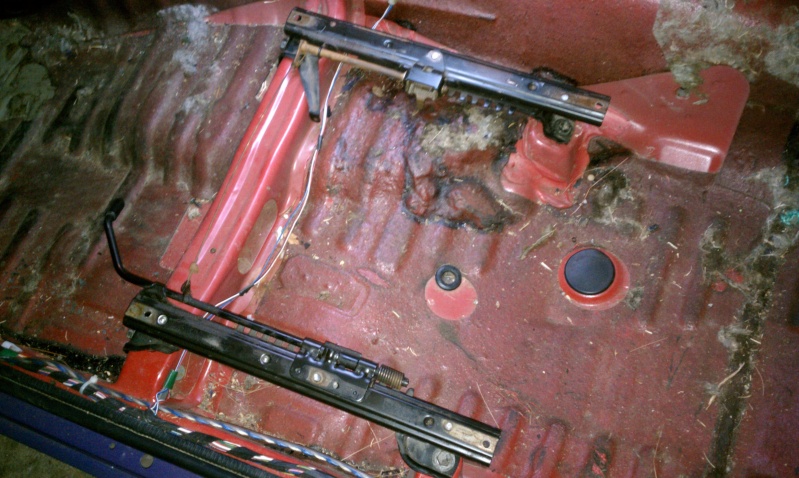
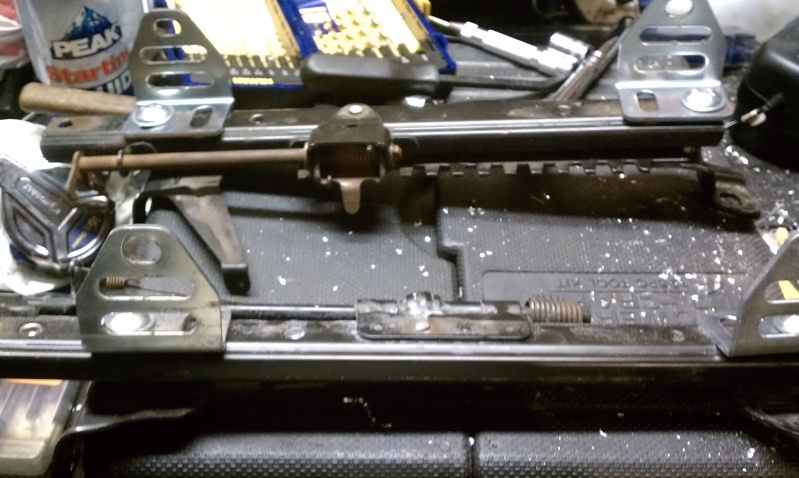
Step 5: once both are sides are separated, you can reinstall the rails into the car using the original hardware. Try to keep the two sides even with each other, they can slide and lock independent of each other now that the frame is off. This is not a bad thing because your new seat will tie the two together just the same as the original frame.

Image

Step 6: attach your mounting brackets to the seat and set the seat on the brackets in the car, then mark where your holes will be and take the seat back out. The stock rails are 1" wide and spaced exactly 15" apart, so your brackets will need to be 16" apart from bolt center to bolt center. I was going to try to use 4"x4" L shaped aluminum to make the L brackets, but that crap was hard. I got pre-fabbed universal seat brackets. These are available on eBay for $30 shipped. With these bolted to my seat, I needed spacers because the front was 15.5" wide and the rear was 14.5" wide. I got longer bolts and some spacers to make the brackets 16" apart so they sit centered on the rails. I also got some carriage bolts to fit under the seat to hold the brackets to the rails.

I would recommend using these pre-fabbed brackets off eBay for $29.99 shipped: http://item.mobileweb.ebay.com/viewitem ... 1603727990

I got a set of Nagisa Auto brackets:
Image

Here are the Nagisa brackets bolted to the seat with the longer bolts and spacers. These spacers put the centers of the base brackets exactly 16" apart so they sit dead center with the rails.
Image

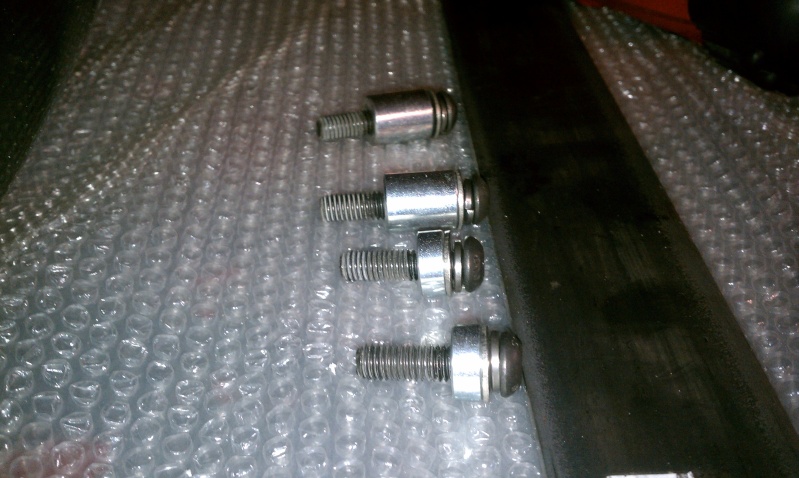
These are the longer bolts and spacers. I don't know exactly what size (if any) spacers your seat may need, as I was under the impression they were all square on the bottom anyways. Spacers are 1/4" and 3/4" long, 5/16" ID, that works out to 0.003" difference between 5/16" and 8mm, the seat bolts are m8x1.25 thread BTW.
Image

I used carriage bolts to bolt the brackets to the rails. I THINK they are 3/8" thread, I know they are 1" long, and I had to cut about 1/4" off each bolt because they were too long, they bound up the slide mechanisms and I have zero adjustment, steering wheel was in my chest lol. Also I would like to point out how important it is to keep your workplace clean and organized. I actually have 3 different tape measures somewhere in there because I kept losing them in all my mess lol.
Image

I didn't take any pictures but I did run into a fitment issue with the seat bottom and the sliders adjuster arm. When you pull the lever, it turns another arm linked to the other rail. That arm comes up and hits the bottom of the seat. That's where the Dremel comes in. I cut a little notch, maybe 1.5"x0.5" so the arm could swing up freely and pull the other side easy. It all works smoothly now, and you'd never know I cut the hole since it's underneath the removable cushion in the front.

It's hard to see, but here it is all bolted in and ready to go. Doing it this was shouldn't cost more than 50 bucks, add more for however much you drink of course.
Image

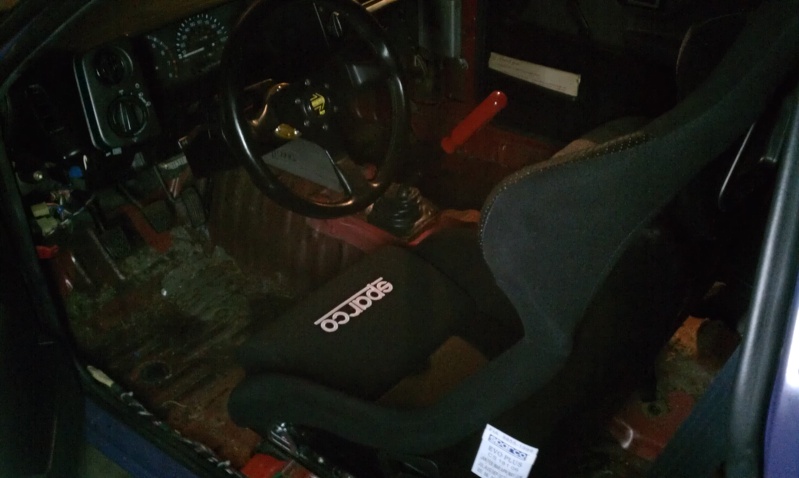
Now sit back and crack a cold one, cuz you just saved a hunnad buxxx.
Last edited by carbd7age on Mon Feb 11, 2013 8:37 am, edited 5 times in total.
Eric'sFreeAE86 from the old site
Knockoff Crew member #0001

User avatar
morgan
Club4AG Pro
Posts: 918
Joined: Thu Jan 10, 2013 10:29 pm
Location: og, nj

Re: DIY seat brackets????

Postby morgan » Mon Jan 21, 2013 9:28 am

i didnt do a full write up, plan on that when i do my passengers side seat, but heres a few pics...
i measured everything before removing the stock sliders and drew a little diagram. then i measured the aftermarket seat mounting points and drew my final drawing for making the bracketry. then i cut everything off, made the cross pieces and welded them up.
just take your time, measure twice, cut once, and it will work out well. you can see that on the handle to adjust teh seat, i made an extension. mock it all up before welding to be sure everything will work right.
Image
Image
Image
haha cali...i got one of your 86's and you're not getting it back.
My turd of an 86
20v swapped 86 write-up

User avatar
carbd7age
Club4AG Pro
Posts: 803
Joined: Sat Jan 12, 2013 5:56 am
Location: Chattanooga, TN

Re: DIY seat brackets????

Postby carbd7age » Mon Jan 21, 2013 3:49 pm

Ok that works for bottom mount, what about side mount? Would I still need to weld on those cross plates? I was hoping to not have to weld nothin.
Eric'sFreeAE86 from the old site
Knockoff Crew member #0001

User avatar
morgan
Club4AG Pro
Posts: 918
Joined: Thu Jan 10, 2013 10:29 pm
Location: og, nj

Re: DIY seat brackets????

Postby morgan » Mon Jan 21, 2013 4:49 pm

Oh, side mount...do you have the L brackets? The Nagisa rails are made for that, ever seen one? They have studs welded to mount the L brackets
haha cali...i got one of your 86's and you're not getting it back.
My turd of an 86
20v swapped 86 write-up

User avatar
carbd7age
Club4AG Pro
Posts: 803
Joined: Sat Jan 12, 2013 5:56 am
Location: Chattanooga, TN

Re: DIY seat brackets????

Postby carbd7age » Mon Jan 21, 2013 5:14 pm

Well see that's why I ordered some 4"x4" angle metal, so yeah that's technically an L lol. I'm copying off the Buddy Club rails, they aren't linked from one side to the the other and they are for side mount only. We'll see what I can come up with when it all gets here later this week.
Eric'sFreeAE86 from the old site
Knockoff Crew member #0001

User avatar
morgan
Club4AG Pro
Posts: 918
Joined: Thu Jan 10, 2013 10:29 pm
Location: og, nj

Re: DIY seat brackets????

Postby morgan » Mon Jan 21, 2013 6:24 pm

I think I have a set of 4 L brackets from a nagisa rail I had a few years back, want them, I have no use for them.
haha cali...i got one of your 86's and you're not getting it back.
My turd of an 86
20v swapped 86 write-up

User avatar
carbd7age
Club4AG Pro
Posts: 803
Joined: Sat Jan 12, 2013 5:56 am
Location: Chattanooga, TN

Re: DIY seat brackets????

Postby carbd7age » Tue Jan 22, 2013 5:20 am

If I can't make this work, yes definitely!
Eric'sFreeAE86 from the old site
Knockoff Crew member #0001

User avatar
morgan
Club4AG Pro
Posts: 918
Joined: Thu Jan 10, 2013 10:29 pm
Location: og, nj

Re: DIY seat brackets????

Postby morgan » Tue Jan 22, 2013 6:37 am

just let me know if you want them, i found them last nite, brand new never used.
haha cali...i got one of your 86's and you're not getting it back.
My turd of an 86
20v swapped 86 write-up

86_Chaser
Club4AG Regular
Posts: 49
Joined: Sat Jan 19, 2013 8:45 pm

Re: DIY seat brackets????

Postby 86_Chaser » Tue Jan 22, 2013 8:05 am

Stock brackets with the sliders that came with it

Image

Image

Image

User avatar
carbd7age
Club4AG Pro
Posts: 803
Joined: Sat Jan 12, 2013 5:56 am
Location: Chattanooga, TN

Re: DIY seat brackets????

Postby carbd7age » Tue Jan 22, 2013 8:09 am

I see what you did there. Cut the mounting feet off a stock bracket and weld them to the bottom of a universal slider. I don't think my seat comes with a slider, that's why I want to use the stock one. That is the picture j remember from the old site now. It's all coming back lol.
Eric'sFreeAE86 from the old site
Knockoff Crew member #0001

86_Chaser
Club4AG Regular
Posts: 49
Joined: Sat Jan 19, 2013 8:45 pm

Re: DIY seat brackets????

Postby 86_Chaser » Tue Jan 22, 2013 11:50 pm

carbd7age wrote:I see what you did there. Cut the mounting feet off a stock bracket and weld them to the bottom of a universal slide. I don't think my seat comes with a slider, that's why I want to use the stock one. That is the picture j remember from the old site now. It's all coming back lol.


Haha I pick up the sr5 seat at the junkyard for 20 buck so the seat brackets/sliders cost me 20 bucks and couple hours of labor. Beats paying 100 buck for brand name brackets/sliders :)

User avatar
carbd7age
Club4AG Pro
Posts: 803
Joined: Sat Jan 12, 2013 5:56 am
Location: Chattanooga, TN

Re: DIY seat brackets????

Postby carbd7age » Wed Jan 23, 2013 7:00 am

Yeah I'm gonna just chop up my stock seat. I ordered some 4"x4"x12" angle metal to make the side mounts so I can adjust the height and angle.
Eric'sFreeAE86 from the old site
Knockoff Crew member #0001

User avatar
carbd7age
Club4AG Pro
Posts: 803
Joined: Sat Jan 12, 2013 5:56 am
Location: Chattanooga, TN

Re: DIY seat brackets????

Postby carbd7age » Wed Jan 23, 2013 4:32 pm

Got my metal today. It's 3/8" thick 6061 aluminum. I think it's overkill now that I have it in my hand lol. I have read DIY seat mounts on other forums using 1/4" steel stock, so I figured a little thicker aluminum would do the same job with less weight. I will probably cut away a lot of the middle sections to further reduce weight. Another reason I picked the aluminum is because it is kinda rounded along the edges that might rub or scratch the sides of the seat, whereas steel is usually more square. My seat will be delivered Monday. 8-)
Eric'sFreeAE86 from the old site
Knockoff Crew member #0001

User avatar
morgan
Club4AG Pro
Posts: 918
Joined: Thu Jan 10, 2013 10:29 pm
Location: og, nj

Re: DIY seat brackets????

Postby morgan » Thu Jan 24, 2013 7:49 am

flat stock or "L" stock?
haha cali...i got one of your 86's and you're not getting it back.
My turd of an 86
20v swapped 86 write-up

User avatar
carbd7age
Club4AG Pro
Posts: 803
Joined: Sat Jan 12, 2013 5:56 am
Location: Chattanooga, TN

Re: DIY seat brackets????

Postby carbd7age » Thu Jan 24, 2013 11:22 am

L stock, 4" on each side.
Eric'sFreeAE86 from the old site
Knockoff Crew member #0001

User avatar
morgan
Club4AG Pro
Posts: 918
Joined: Thu Jan 10, 2013 10:29 pm
Location: og, nj

Re: DIY seat brackets????

Postby morgan » Thu Jan 24, 2013 11:56 am

cool, i was going to say i tried bending 6061 one time, 1/4" thick, sh!t just snapped on me.
haha cali...i got one of your 86's and you're not getting it back.
My turd of an 86
20v swapped 86 write-up

User avatar
carbd7age
Club4AG Pro
Posts: 803
Joined: Sat Jan 12, 2013 5:56 am
Location: Chattanooga, TN

Re: DIY seat brackets????

Postby carbd7age » Thu Jan 24, 2013 2:48 pm

Yeah I don't see this 3/8" EVER bending lol. I will probably trim a bunch off where it's too wide or tall. For aluminum this stuff is heavy-duty!
Eric'sFreeAE86 from the old site
Knockoff Crew member #0001

User avatar
carbd7age
Club4AG Pro
Posts: 803
Joined: Sat Jan 12, 2013 5:56 am
Location: Chattanooga, TN

Re: DIY seat brackets????

Postby carbd7age » Sat Jan 26, 2013 5:42 pm

I took my seat apart today. This is gonna work just fine. Why pay close to $200 for one set of seat brackets when you can make you own!? Morgan can I get those Nagisa brackets? I think they will be easier to use than the big L aluminum I got, maybe I can return it, or make something else.... Anyways, stay tuned for pictures and a half-drunk how-to.
Eric'sFreeAE86 from the old site
Knockoff Crew member #0001

User avatar
carbd7age
Club4AG Pro
Posts: 803
Joined: Sat Jan 12, 2013 5:56 am
Location: Chattanooga, TN

Re: DIY seat brackets!!!!!!1

Postby carbd7age » Sun Jan 27, 2013 1:43 pm

I edited the first post, this is now a bonafide how-to article now! Albeit unfinished for now, I got er done pretty good.
Eric'sFreeAE86 from the old site
Knockoff Crew member #0001

User avatar
carbd7age
Club4AG Pro
Posts: 803
Joined: Sat Jan 12, 2013 5:56 am
Location: Chattanooga, TN

Re: DIY seat brackets!!!!!!1

Postby carbd7age » Fri Feb 08, 2013 7:22 pm

I haven't forgot about this thread. I've added some more to the first post, got all the hardware I need, just need to put it all together.
Eric'sFreeAE86 from the old site
Knockoff Crew member #0001

Karloz
Posts: 1
Joined: Tue Feb 05, 2013 1:54 pm

Re: DIY seat brackets!!!!!!1

Postby Karloz » Mon Feb 11, 2013 4:28 am

Thanks for the write up! I was able to do this for the rear of the slider. But these cheap ass ebay seats are too freakin tall! When I laid the bare sliders straight on top of the seat support bar on the floor, I could barely fit my hands between the wheel and my legs. I had to cut off the support bar on the floor to gain an extra inch and a half. Has this ever happened to any one else?

The only way the seat would end up at the correct height would be if I removed the sliders completely and found a way to side mount it, which is not possible to do with these seats.

User avatar
carbd7age
Club4AG Pro
Posts: 803
Joined: Sat Jan 12, 2013 5:56 am
Location: Chattanooga, TN

Re: DIY seat brackets!!!!!!1

Postby carbd7age » Mon Feb 11, 2013 8:13 am

Yes that is what happened when I tried to install bottom mount reclining seats. This one piece bucket with side mounts has a much lower seat bottom and it fits perfect. I got a pair of almost brand new Sparco Sienna seats but they were way too tall, even with Buddy Club flat brackets and universal sliders. I might have been able to lower the seats by removing the sliders, but I didn't want to lose that option. So I sold those seats to some dude that put them in a Samari or something.

Anyway, seat is finished! Look at the first post for updates, info, and pics
Eric'sFreeAE86 from the old site
Knockoff Crew member #0001

JapaneseDeman
Club4AG Enthusiast
Posts: 61
Joined: Fri Jan 11, 2013 10:12 pm

Re: DIY seat brackets - completed 02/10/2013

Postby JapaneseDeman » Thu Feb 21, 2013 12:56 am

eric. nice post brokilla. I like the entirety and principle of it. I may have to try some of it. I know my seat I have (even though it's a junky APC recliner,i got it on the cheap cheap and it works) it sits way too high and it's using a tweaked oem seat bracket.

props to you broskillet.

User avatar
carbd7age
Club4AG Pro
Posts: 803
Joined: Sat Jan 12, 2013 5:56 am
Location: Chattanooga, TN

Re: DIY seat brackets - completed 02/10/2013

Postby carbd7age » Thu Feb 21, 2013 4:45 am

Thanks man, I appreciate it. I tried to make it as easy as possible for someone to follow.
Eric'sFreeAE86 from the old site
Knockoff Crew member #0001

Ava92
Club4AG Enthusiast
Posts: 84
Joined: Tue Feb 19, 2013 7:06 am
Location: BC, Canada

Re: DIY seat brackets - completed 02/10/2013

Postby Ava92 » Fri Feb 22, 2013 3:42 am

edit
Last edited by Ava92 on Mon Feb 03, 2014 3:56 pm, edited 1 time in total.

Army Fork
Club4AG Expert
Posts: 201
Joined: Mon Feb 04, 2013 10:34 pm

Re: DIY seat brackets - completed 02/10/2013

Postby Army Fork » Fri Feb 22, 2013 5:38 pm

I was looking at buying some Sparco R505's, wonder if I'll run into the same problem. Even buddy club rails are (I think) $180 a shot, rather not have to pay that on top of the price of the seats.
1984 SR5-GTS 20V ST/BT coupe.
- Stance GR+ Coilovers
- Mishimoto Cooling
- T3 adjustable 4-bar, Panhard, traction brackets, tension rods
- T3 Short shift
- Manual rack conversion
- Blacktop electronics

User avatar
mikeyee
Club4AG Enthusiast
Posts: 167
Joined: Wed Jan 09, 2013 3:33 pm
Location: SF Bay, CA
Contact:

Re: DIY seat brackets - completed 02/10/2013

Postby mikeyee » Fri Feb 22, 2013 11:51 pm

great write up OP!

really useful for anyone with limited tools to make a GOOD seat bracket on the cheap!

Zenki85
Club4AG Expert
Posts: 308
Joined: Wed Jan 09, 2013 11:08 pm

Re: DIY seat brackets - completed 02/10/2013

Postby Zenki85 » Sat Feb 23, 2013 12:12 am

Great thread! More DIY's please!
TEAM 'CLASSIC
A 'CLASSICALIFORNIACAR
Adriansadriano@yahoo.com - email

User avatar
carbd7age
Club4AG Pro
Posts: 803
Joined: Sat Jan 12, 2013 5:56 am
Location: Chattanooga, TN

Re: DIY seat brackets - completed 02/10/2013

Postby carbd7age » Sat Mar 02, 2013 2:39 pm

Thanks guys. I'm not dead, just busy. I'll get back in the garage eventually.
Eric'sFreeAE86 from the old site
Knockoff Crew member #0001