A broke college kid, and his broken rolla...
Re: A broke college kid, and his broken rolla...
Looking good! What white epoxy did you use all over the front end? I'm about to that point on my car, I have industrial epoxy from work, but might use automotive epoxy primer.
Re: A broke college kid, and his broken rolla...
boosted86 wrote:Looking good! What white epoxy did you use all over the front end? I'm about to that point on my car, I have industrial epoxy from work, but might use automotive epoxy primer.
Any white you see, is the paint the car had before i started. The grey primer on the other hand is Nason Ful-Poxy. Nason is the "cheaper" line of Dupont paints. I have the Ful-poxy primer as well as a high build and sealer, all from Nason. I'll splurge on base and clear, once i get there
Smallish update,
I have really been grinding out some bodywork this week. It is a super slow job, but i hope it will all be worth it int he end. I want the body, front fenders, drivers door and rear tail light panel re-coated in epoxy primer and the first coat of high build primer. I really hope I can pull all of this off by the end of this weekend. That would leave only the passenger door and hood to do. Once those are done, I will finally get to the point of block sanding the entire car.
It will be a lot of work, but a big milestone in the build. Here are some pics for those interested.
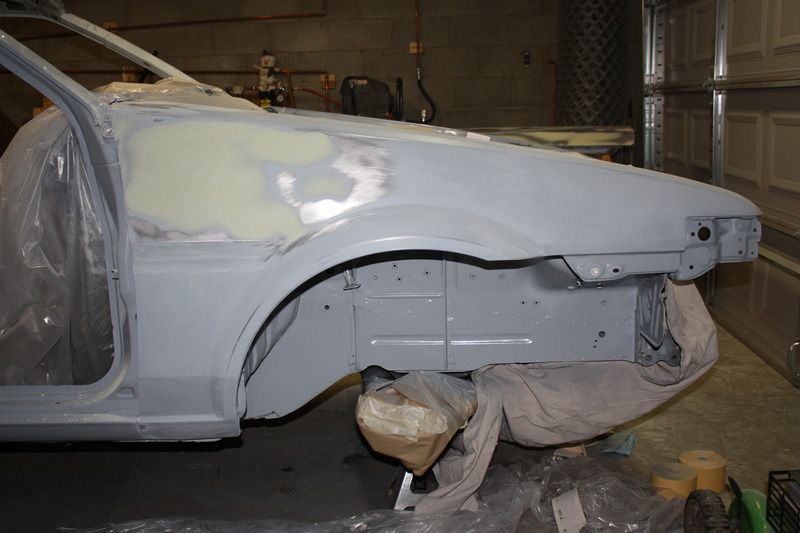
Its hard to see with the flash, but I think I finally got the body line right, on the drivers side rear arch!!
More updates to come...
Re: A broke college kid, and his broken rolla...
Keep pushing. It looks bitchin. I just don't have the patience for body work so mines in the shop now for paint. Every minute counts when it comes to body work and it looks like you're doing it the right way.
Re: A broke college kid, and his broken rolla...
shagymc wrote:Keep pushing. It looks bitchin. I just don't have the patience for body work so mines in the shop now for paint. Every minute counts when it comes to body work and it looks like you're doing it the right way.
Thanks for the kind words. I definitely think I bit off a bit more than I could chew with this project. It is A LOT of work for someone learning how to do all of this stuff on the fly. Do-able for anyone, it just takes a lot of time and patience. I think I have said it before, but after doing this amount of bodywork, I completely understand the prices for a "nice paint job". I haven't been keeping track of the hours I have put into the body work, which is probably a good thing. I'm sure I would be absolutely floored if I knew how much time it has taken me to get this far in the body work
I'm hoping for a full Saturday of work this weekend, we will see what comes of it.
Re: A broke college kid, and his broken rolla...
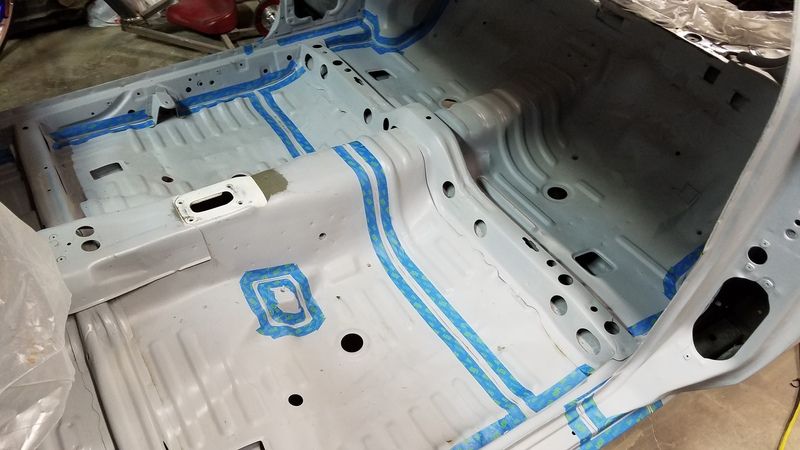
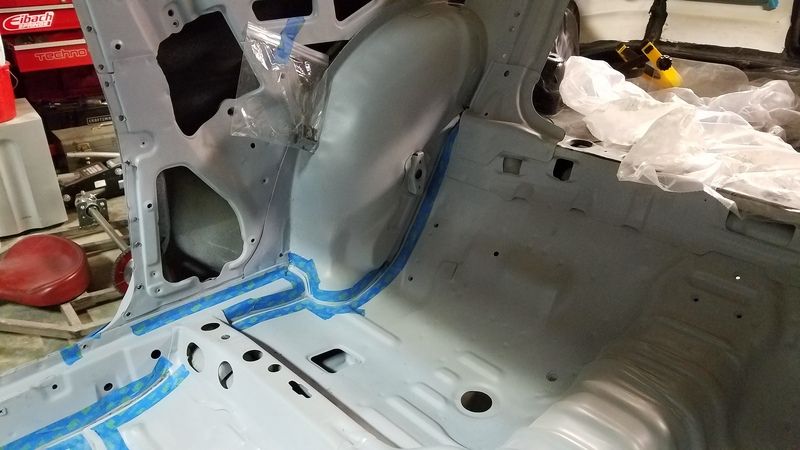
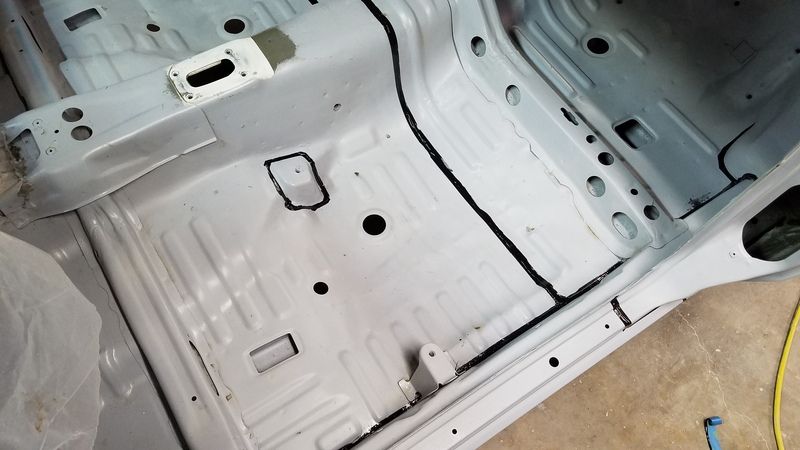
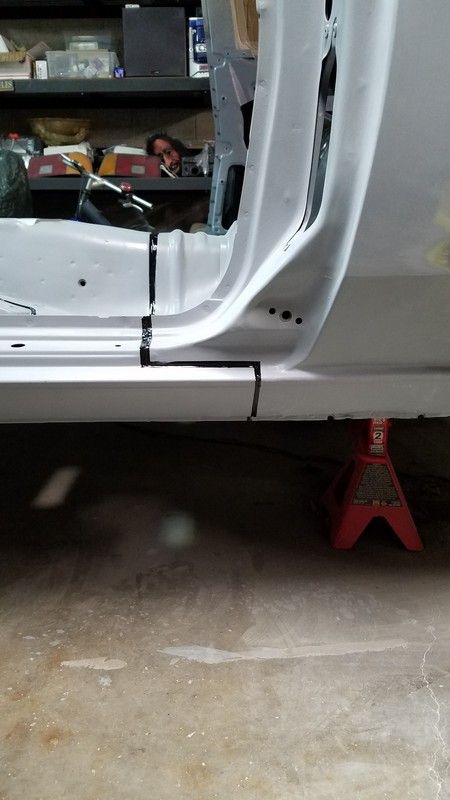
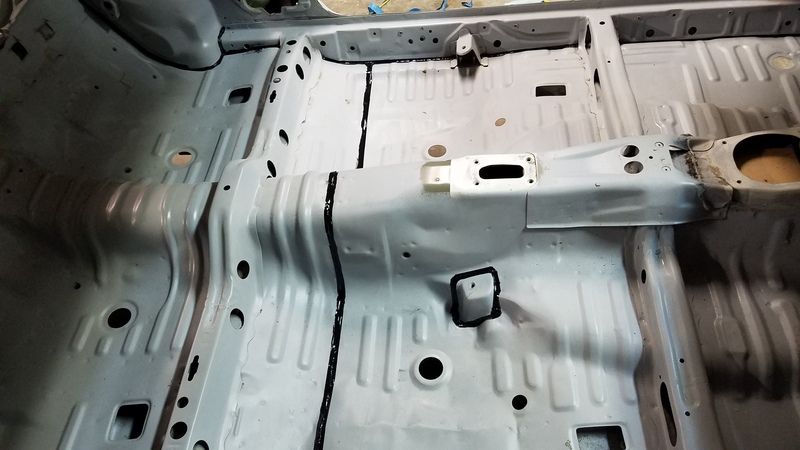
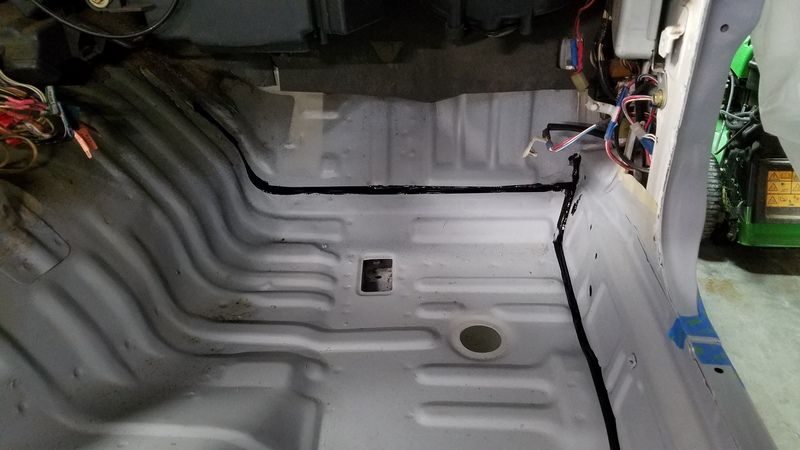
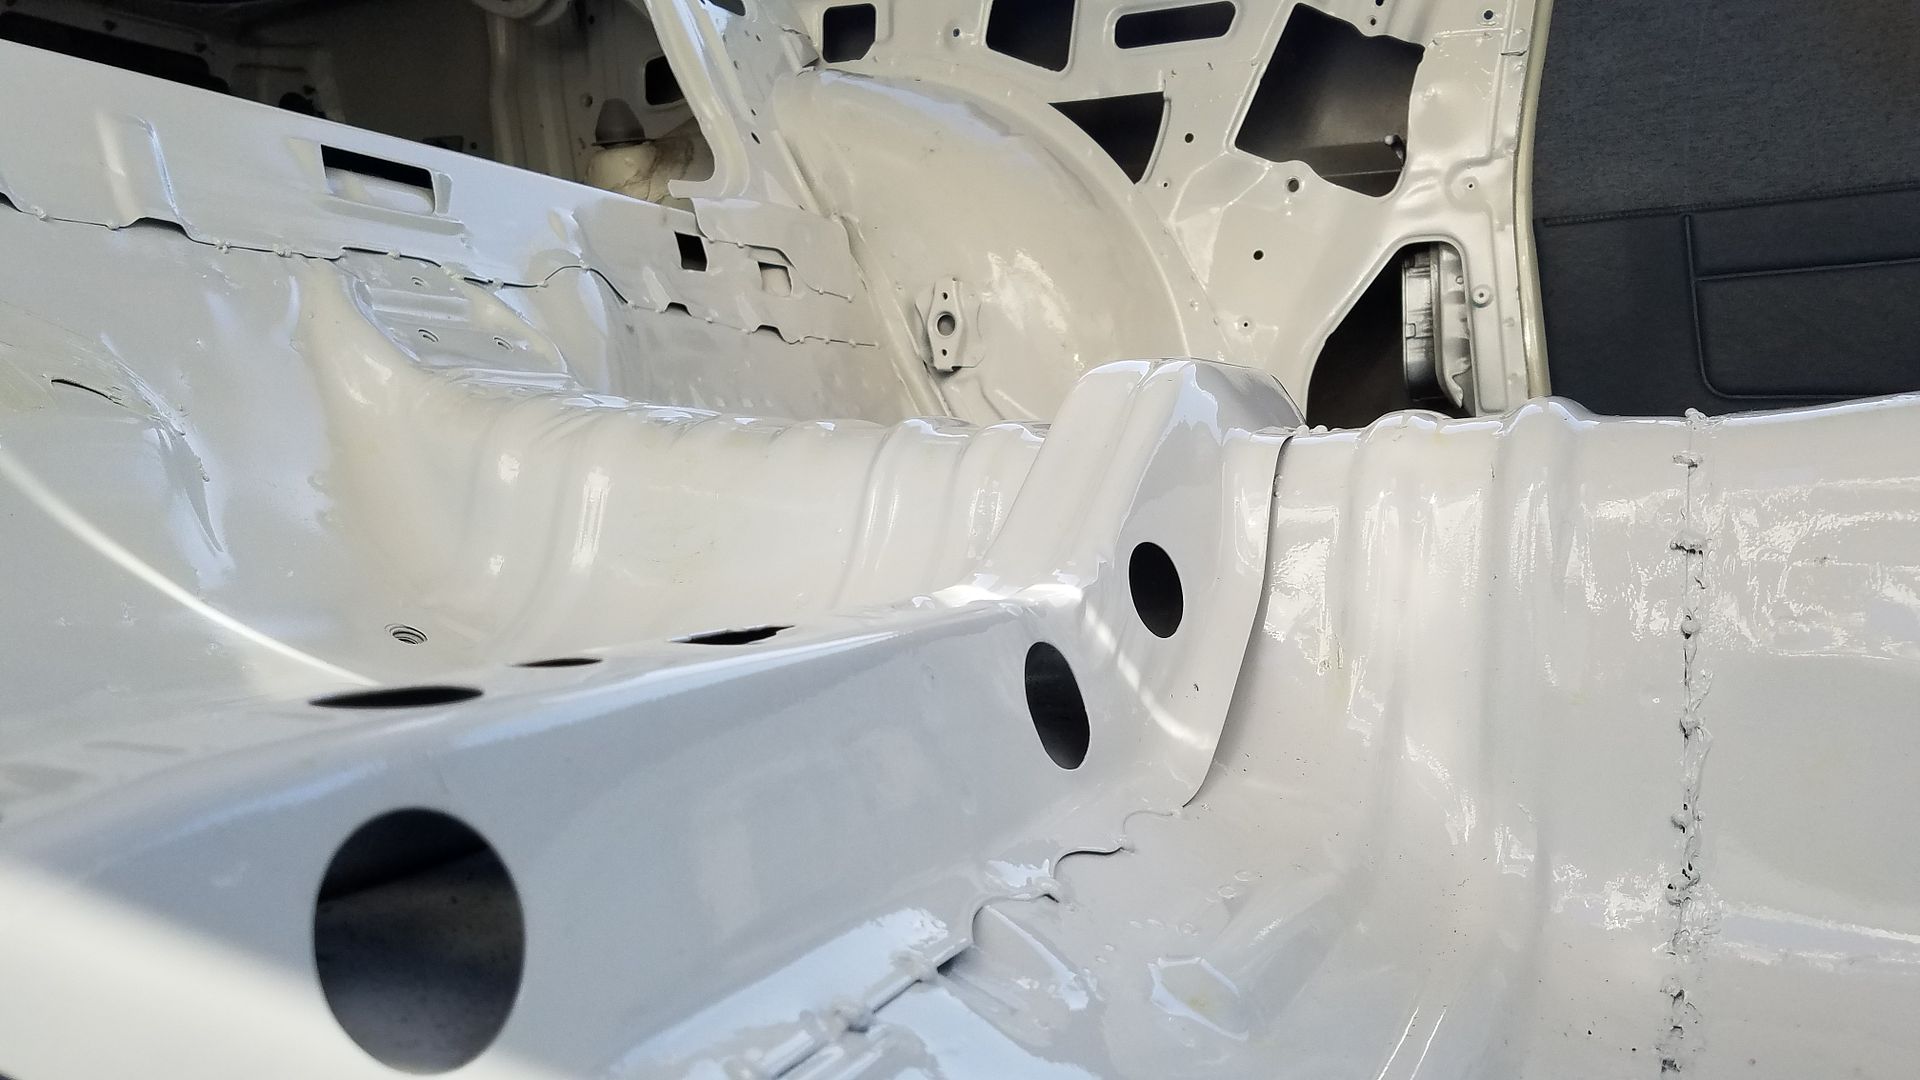
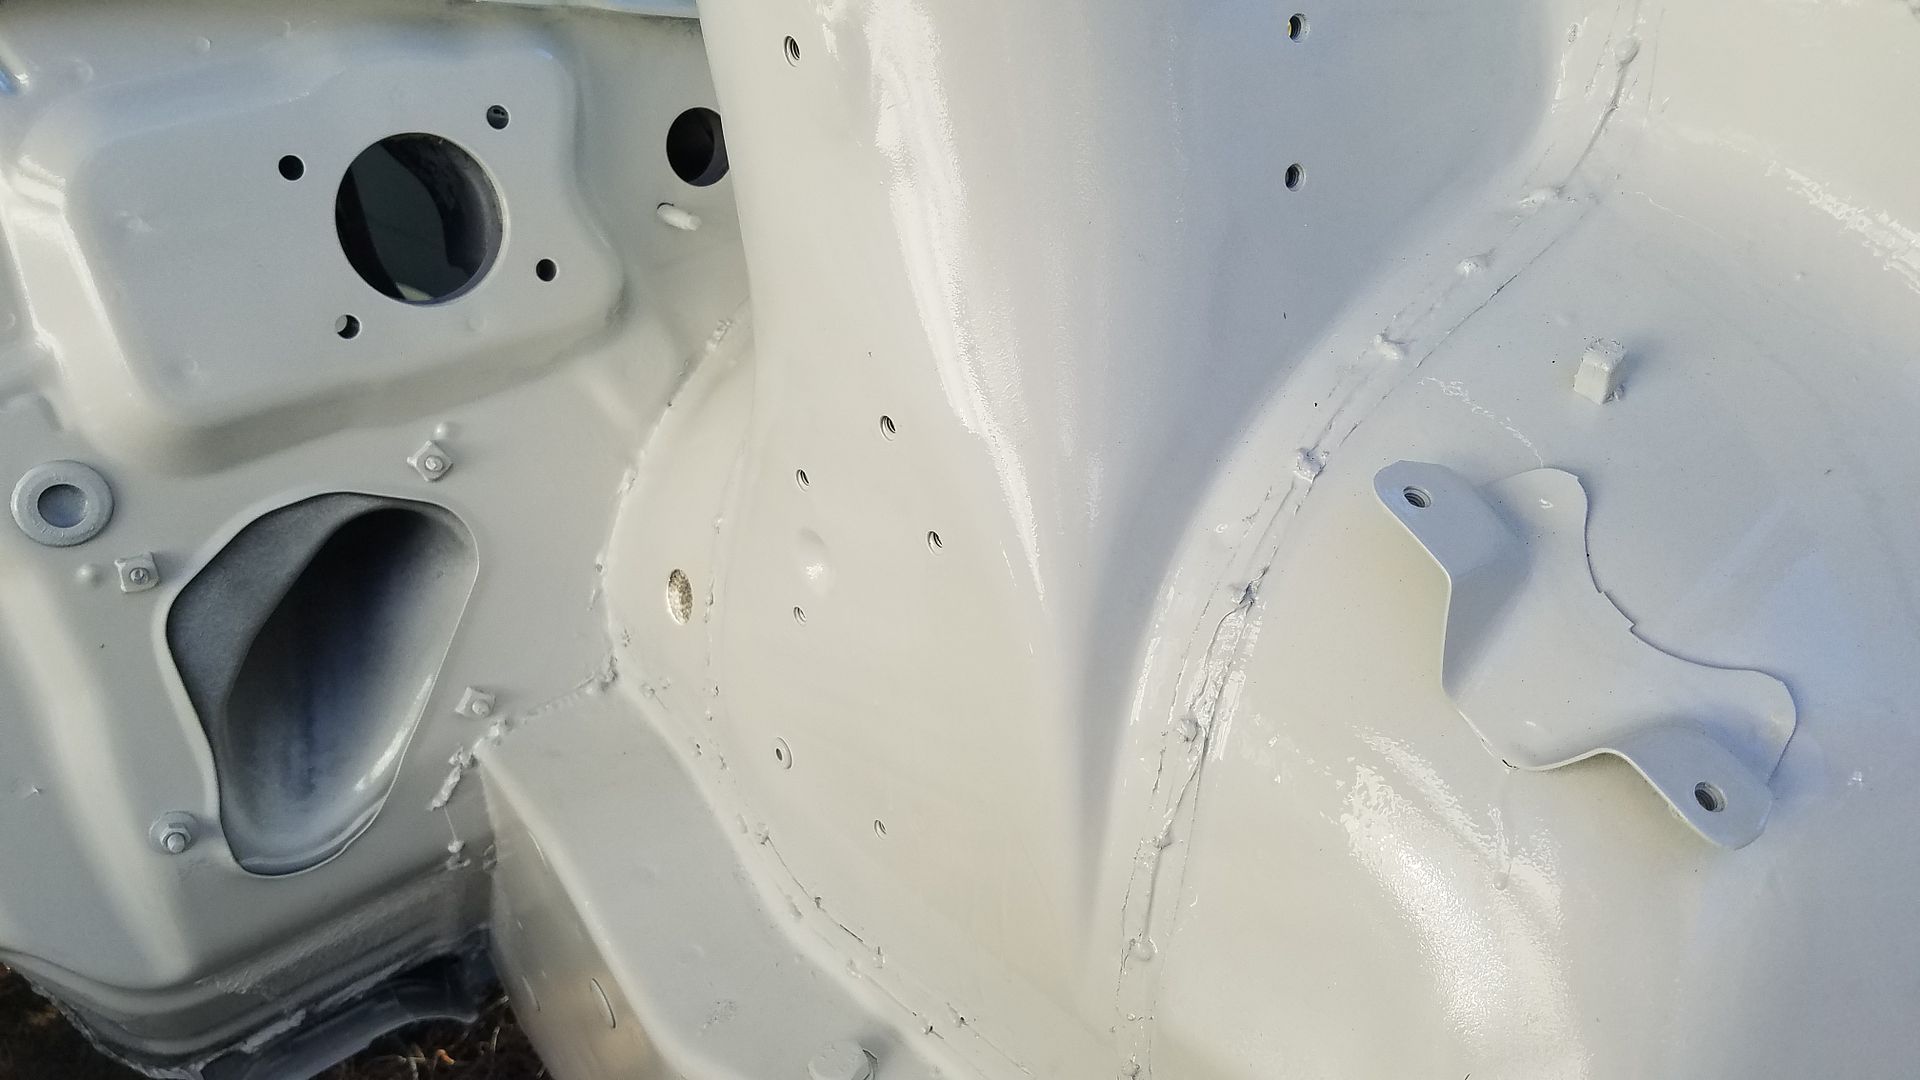
Did some more bodywork over the weekend, its getting there, just super slow. I managed to seam seal the interior on Saturday. I still have to do the trunk and wheel wells, but overall the process wasn't too bad. The seam sealer hardens extremely fast, so make sure you take that into account if you ever try doing it yourself. I used heavy bodied seam sealer from 3M, the two part kind. I may have went overboard with the prep and all but I wanted as clean of lines as I could get. IT does not match the "factory finish" but it will do for me.
1. Outline the seams with painters tape
2. Scuff and clean seam (I used a maroon scotch brite pad)
3. Apply seam sealer in small areas, due to short work time.
4. Since I was wearing latex gloves, I used my finger to spead the sealer. Small brushes should work too.
5. ***Make sure to remove tape BEFORE you move to the next area.*** You want to be able to remove the tape before it fully hardens, luckly I pulled up mine just as time was runnig out.
I still want to try and get the fenders, door, and body work areas in primer this week, I'm running out of warm days.
More updates to come...
-
grappletech

- Club4AG Expert
- Posts: 346
- Joined: Sat Jan 12, 2013 12:13 pm
Re: A broke college kid, and his broken rolla...
welp, there goes my underwear
87 GTS Coupe stock and Super Duper Clean
87 GTS Coupe Beams 3sge (under construction cuz I'm slow and lazy and broke-FML)
87 SR5 Coupe Shell. (Sold)
86 SR5 Hatch Shell
86 GT-SR5 Coupe 20v Swap
87 GTS Coupe Beams 3sge (under construction cuz I'm slow and lazy and broke-FML)
87 SR5 Coupe Shell. (Sold)
86 SR5 Hatch Shell
86 GT-SR5 Coupe 20v Swap
Re: A broke college kid, and his broken rolla...
I did some more epoxying last night. I might shoot another coat when I get home today or maybe try and hit it with a coat of high build before the re-coat window on the epoxy ends, but idk yet.
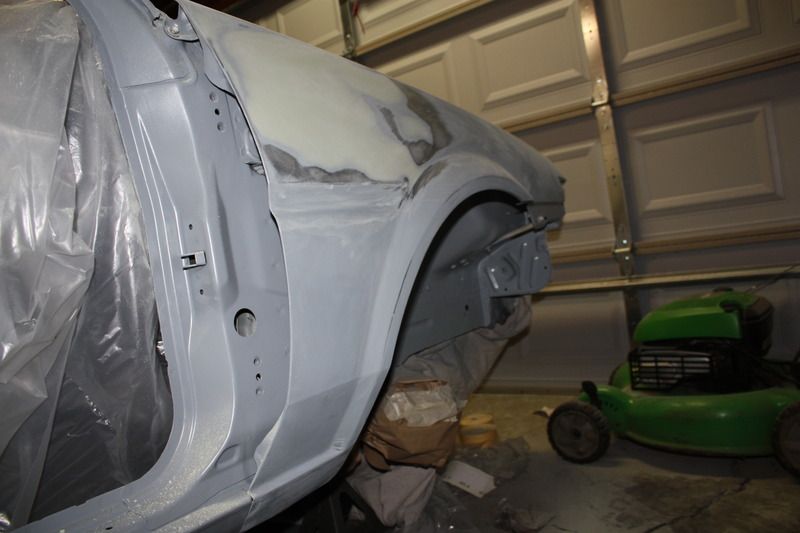
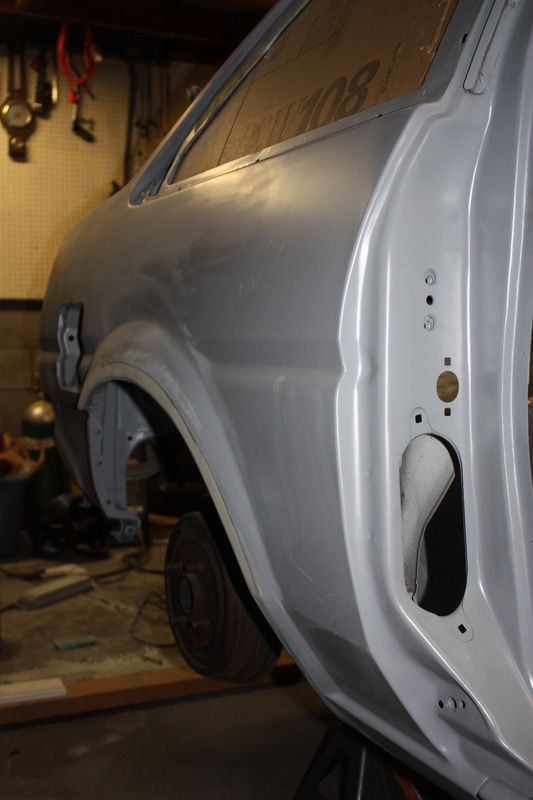
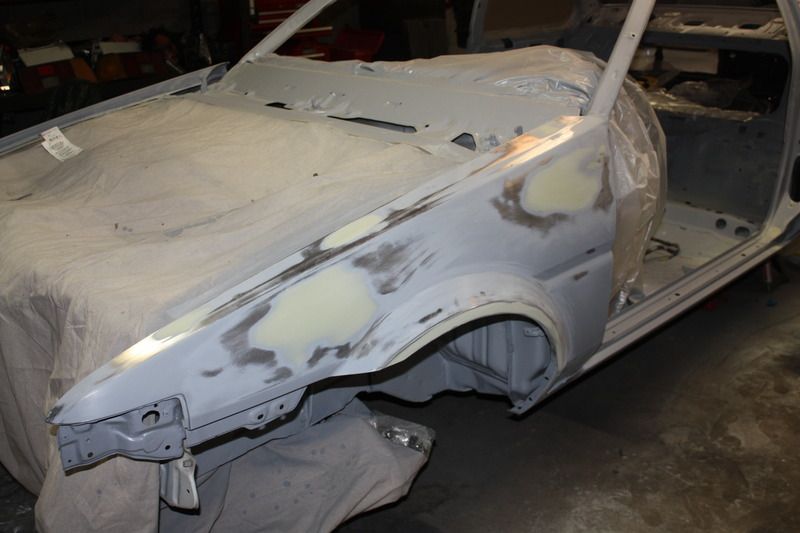
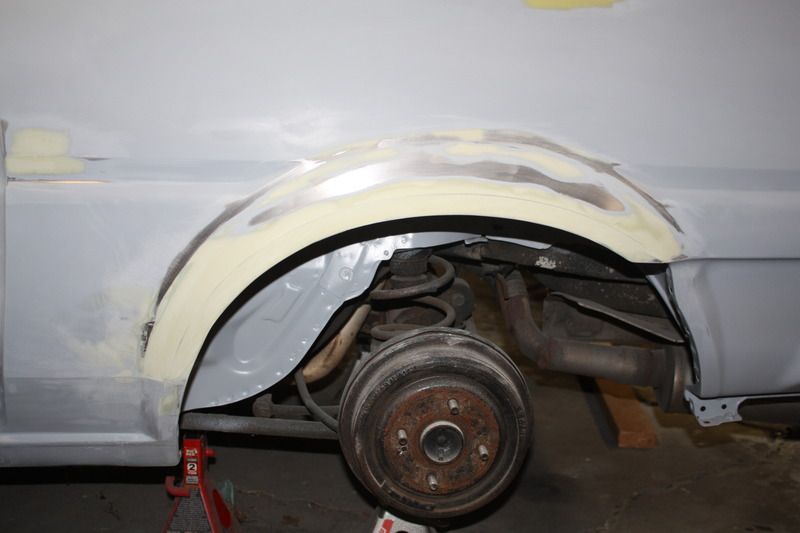
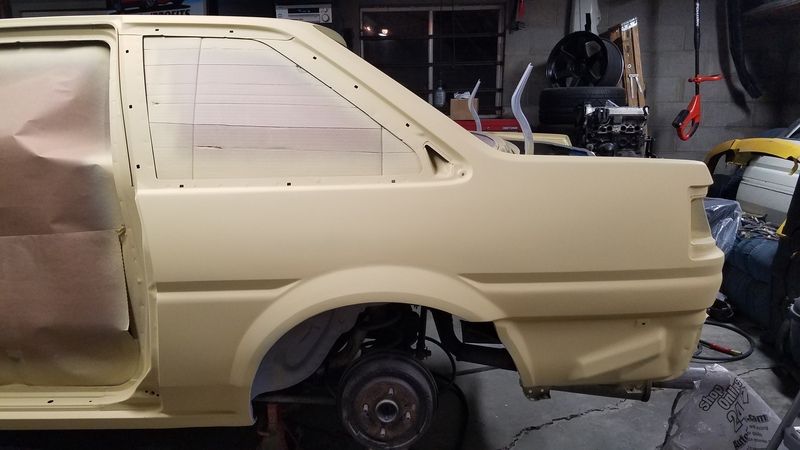
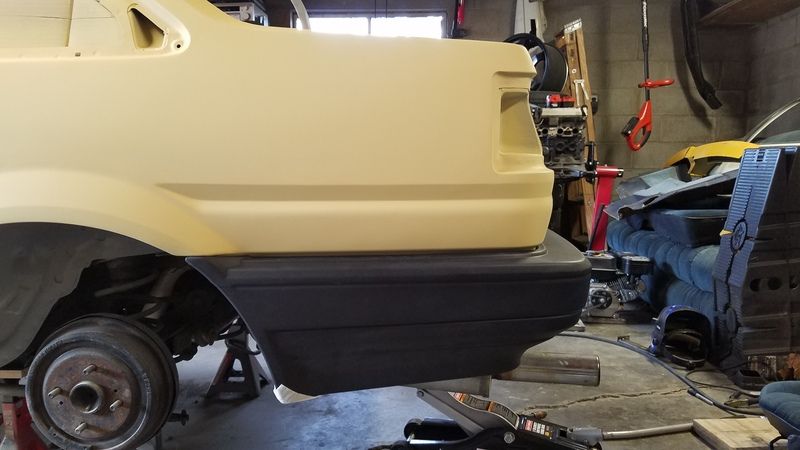
I still have quite a bit of "ghosting" on the body filler areas but that should all disappear when i start laying down the high build primer. The door and fenders look really straight, I am super happy with how they have turned out so far. The rear tail light panel *Especially the drivers side* is really starting to piss me off.... Idk if i should try and scavenge a panel or keep trying to "fix" it with body hammers and filler. It a super hard body line to get correct, I just don't know what to do
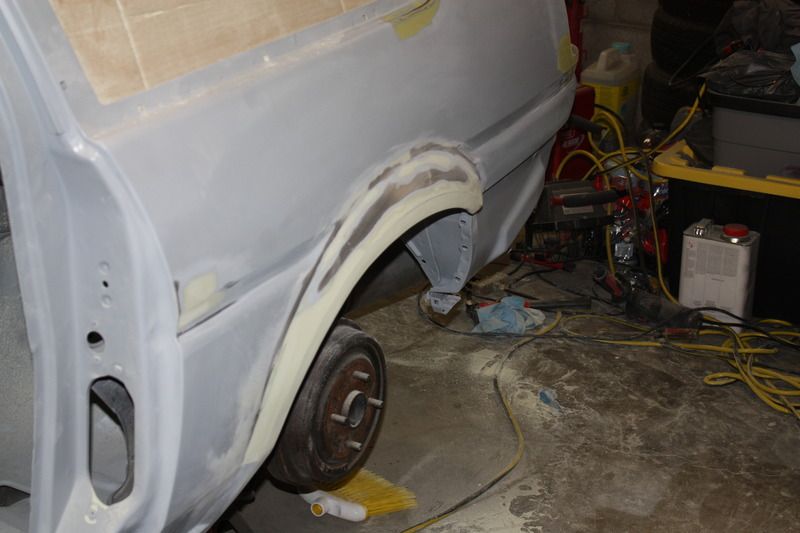
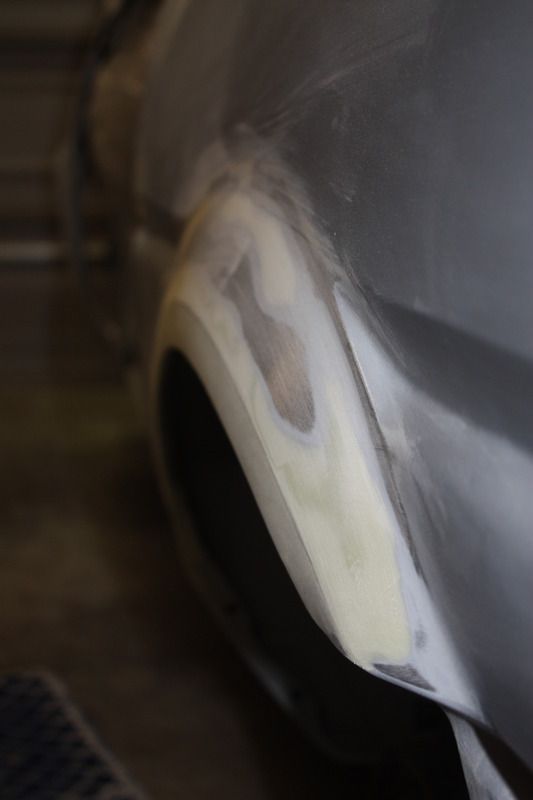
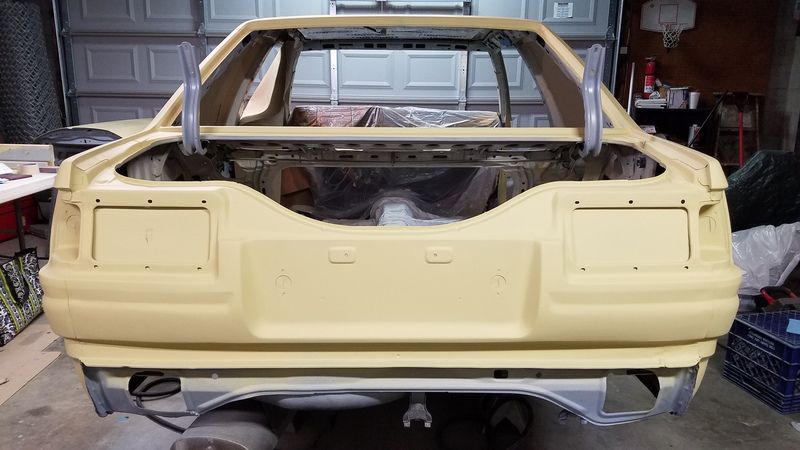
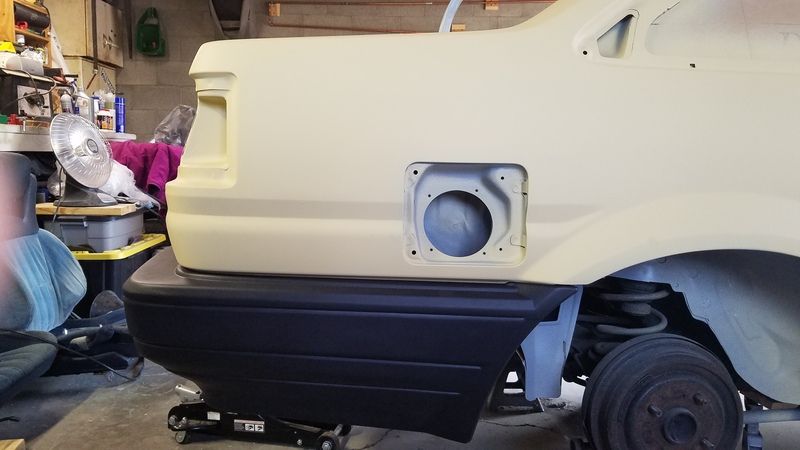
On a positive note, I'm super happy with how the drivers side quarter panel lip came out. looks pretty close to how it should, what do you all think?
I am still trying to decide to run fender flares or not. Since I am currently doing body work, now would be the perfect time to add in fender flares. However, I am having a hard time justifying cutting up the body. Once the body is cut, I can't go back. On the flip side of that, I can finish getting the stock fender look and later down the road, add flares if I really want to. So many decisions.........
On to pics!
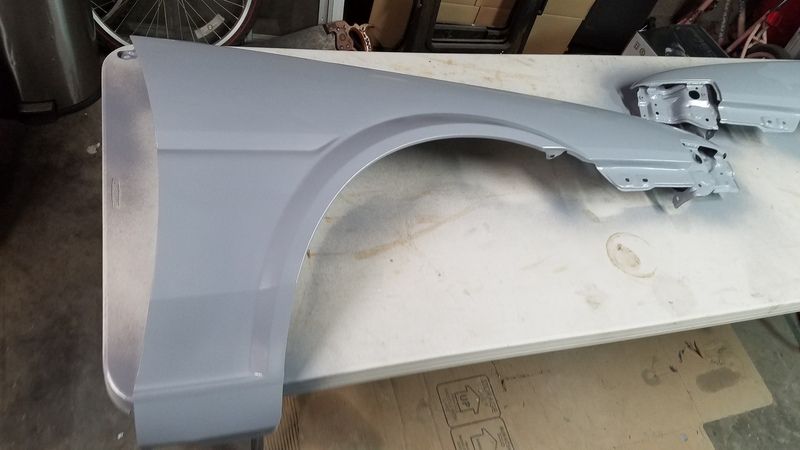
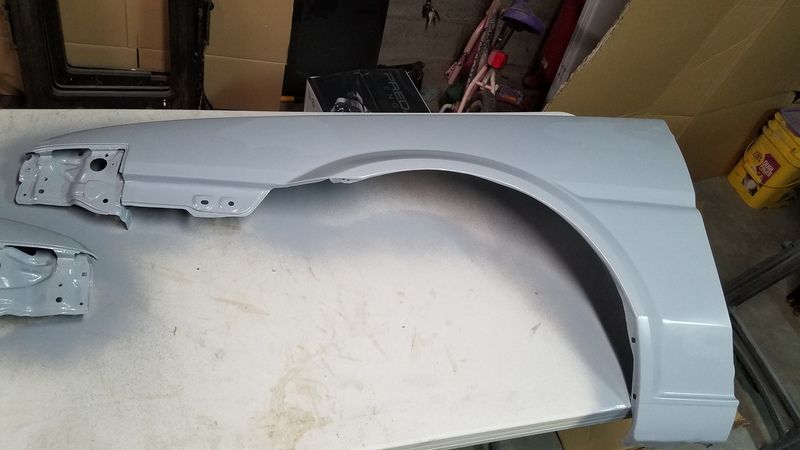

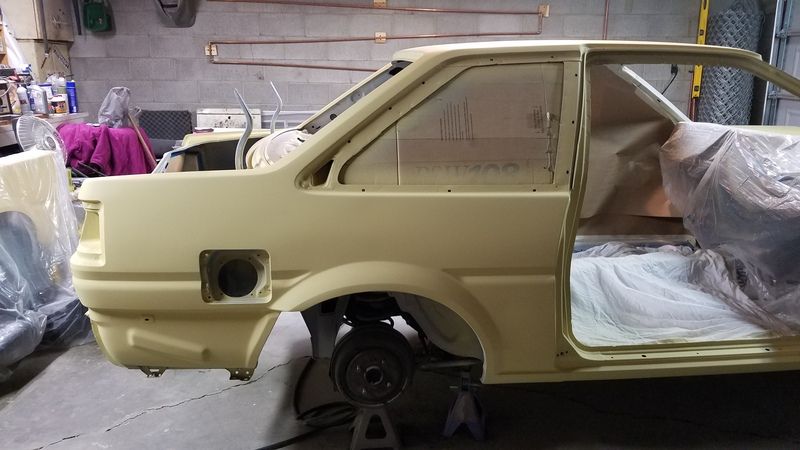
The passenger door and hood are the only panels left that need to be epoxy primed. Lets do this!!!!
I still have quite a bit of "ghosting" on the body filler areas but that should all disappear when i start laying down the high build primer. The door and fenders look really straight, I am super happy with how they have turned out so far. The rear tail light panel *Especially the drivers side* is really starting to piss me off....
On a positive note, I'm super happy with how the drivers side quarter panel lip came out. looks pretty close to how it should, what do you all think?
I am still trying to decide to run fender flares or not. Since I am currently doing body work, now would be the perfect time to add in fender flares. However, I am having a hard time justifying cutting up the body. Once the body is cut, I can't go back. On the flip side of that, I can finish getting the stock fender look and later down the road, add flares if I really want to. So many decisions.........
On to pics!
The passenger door and hood are the only panels left that need to be epoxy primed. Lets do this!!!!
Re: A broke college kid, and his broken rolla...
Fenders and doors look awesome man. As far as flares go, I know on mine with the wheels I'm running, we are rolling the front and rear and giving the front a tiny bit of negative camber to get them fitting under the fenders i.e. -2-3 degrees. The rears we have to pull as well but shouldn't be much of an issue. I would try that first before cutting to see if you dig it since once you cut, there's no going back really.
I feel like you should be able to source a small panel for the trunk body line that is giving you hell and if not, can you take a mold of the passenger side with fiberglass to use on the driver side? Just an idea, might work, might not. Good luck homie! Don't let the little things frustrate you, take a breath, step back, and then go at it a different way. You got this
I feel like you should be able to source a small panel for the trunk body line that is giving you hell and if not, can you take a mold of the passenger side with fiberglass to use on the driver side? Just an idea, might work, might not. Good luck homie! Don't let the little things frustrate you, take a breath, step back, and then go at it a different way. You got this
Re: A broke college kid, and his broken rolla...
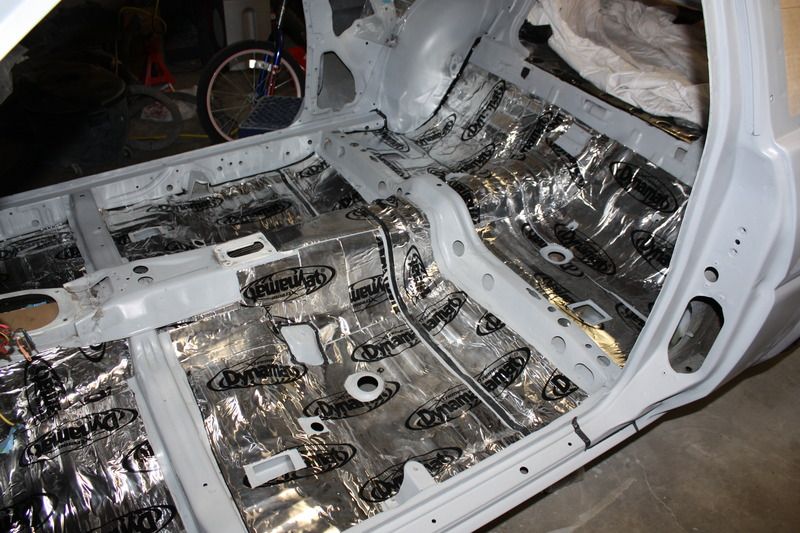
I got a little bit of work done this weekend. Long ago before this project started, I bought a bulk box of Dynamat. For years it sat in my room collecting dust until finally this weekend I decided to start installing it. So far, I have installed the Dynamat on the roof and the floor. I still plan on doing the trunk and doors as well. Even though I have not tested this stuff on the road, I am convinced the change will be dramatic. I usually have the radio turned on in the garage and I for sure notice a difference when I get in and out of the car, even without and doors or glass!! I'm super excited to see what it will sound like when driving and the stereo playing. Also, when I bang on the roof now, I no longer get a metal "tinggggggg" but rather a dull "thud", its crazy. Just 2 pics but progress is progress 
More updates to come...
More updates to come...
-
JDM20VAE101
- Club4AG Expert
- Posts: 388
- Joined: Fri Jan 11, 2013 10:13 pm
Re: A broke college kid, and his broken rolla...
Is that expensive, it comes with adhesive? Glad you get back and working on it. keep it up man!
Ivan's 4AGE BT 20V 6Spd LSD Build Thread
Just Scroll Down & Enjoy!
http://www.club4ag.com/forums/viewtopic.php?f=7&t=4529
Thanks For Looking!
Just Scroll Down & Enjoy!
http://www.club4ag.com/forums/viewtopic.php?f=7&t=4529
Thanks For Looking!
Re: A broke college kid, and his broken rolla...
shagymc wrote:Fenders and doors look awesome man. As far as flares go, I know on mine with the wheels I'm running, we are rolling the front and rear and giving the front a tiny bit of negative camber to get them fitting under the fenders i.e. -2-3 degrees. The rears we have to pull as well but shouldn't be much of an issue. I would try that first before cutting to see if you dig it since once you cut, there's no going back really.
I feel like you should be able to source a small panel for the trunk body line that is giving you hell and if not, can you take a mold of the passenger side with fiberglass to use on the driver side? Just an idea, might work, might not. Good luck homie! Don't let the little things frustrate you, take a breath, step back, and then go at it a different way. You got this
Thanks for the input, I think I have decided to see how it looks blocked out and with wheels on first. If I decide then that I want flares, I can cut and weld up the quarters. I really need to throw the suspension and wheels back on and actually see how it looks sitting on the ground
As for the panel, thanks for the suggestion
JDM20VAE101 wrote:Is that expensive, it comes with adhesive? Glad you get back and working on it. keep it up man!
It was sorta kinda expensive years ago when I bought it. However, I did get it off ebay for somewhat of a deal back then. It was the last box or something, so I got some extra money off. It think it was around $100 for the box but I don't remember for sure. This stuff comes with a tar like adhesive on the back. You basically cut the pieces to size, then peel and stick.
I have heard that home depot sells stuff designed for roofing/gutters that is basically the same for a lot less money. However, I have heard that the Home Depot stuff can smell like tar on hot days or even out of the packaging. The Dynamat seems like super nice stuff and does not smell at all.
-
JDM20VAE101
- Club4AG Expert
- Posts: 388
- Joined: Fri Jan 11, 2013 10:13 pm
Re: A broke college kid, and his broken rolla...
Good!
So I'll go with Dynamat...
Thanks
So I'll go with Dynamat...
Thanks
Ivan's 4AGE BT 20V 6Spd LSD Build Thread
Just Scroll Down & Enjoy!
http://www.club4ag.com/forums/viewtopic.php?f=7&t=4529
Thanks For Looking!
Just Scroll Down & Enjoy!
http://www.club4ag.com/forums/viewtopic.php?f=7&t=4529
Thanks For Looking!
Re: A broke college kid, and his broken rolla...
Nice job especially on the seam sealer work! I didn't think about that when I did on my white coupe project. You can see a little but it wasn't easy applying the sealer on the stitched welds.
Than I decided to use masking tape technique and came out much better.
Than I decided to use masking tape technique and came out much better.
Re: A broke college kid, and his broken rolla...
webyosan wrote:Nice job especially on the seam sealer work! I didn't think about that when I did on my white coupe project. You can see a little but it wasn't easy applying the sealer on the stitched welds.
Than I decided to use masking tape technique and came out much better.
Awesome man!, glad the tape method worked out better for ya. I've been lurking on your build thread for a while now, I just hardly ever post
Re: A broke college kid, and his broken rolla...
Ninja Update...

2 Fenders and a door in high build Primer
Got some more goodies as well that I will post later.
2 Fenders and a door in high build Primer
Got some more goodies as well that I will post later.
Re: A broke college kid, and his broken rolla...
wow, impressive work, especially for a firs time DIY. Kudos!
Re: A broke college kid, and his broken rolla...
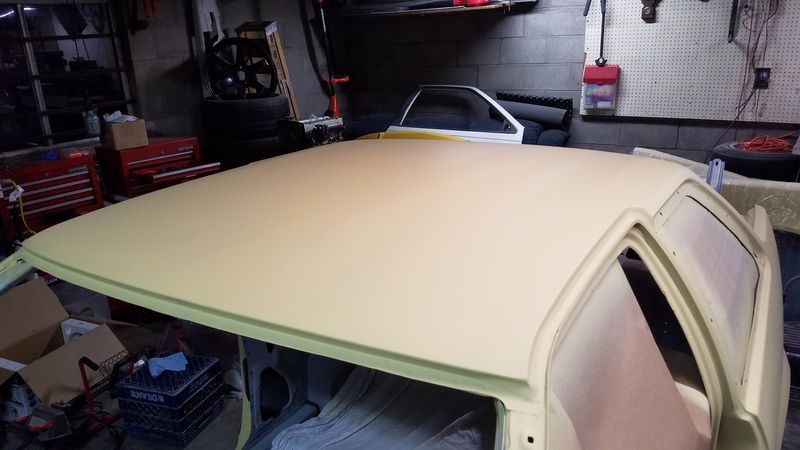
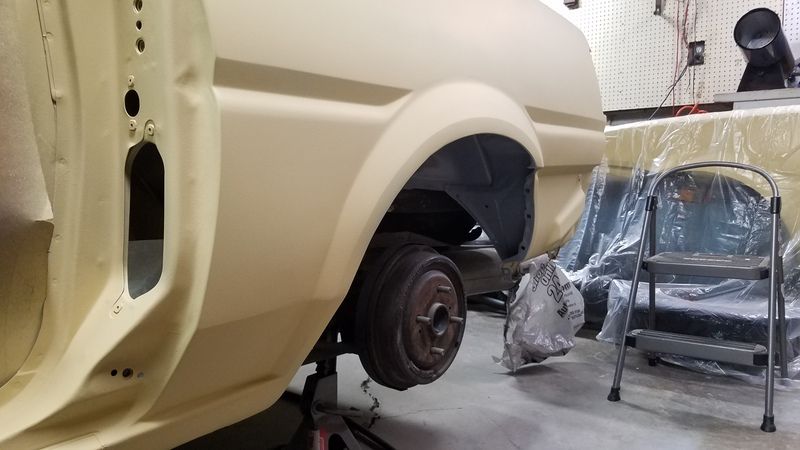
Well, the body is in its first coat of high build primer. Although it feels really good getting to this point, I can now see a lot more imperfections than I could before. I just have to get to blocking and see how bad those trouble spots are going to be. Anyways, on to the pics!
Re: A broke college kid, and his broken rolla...
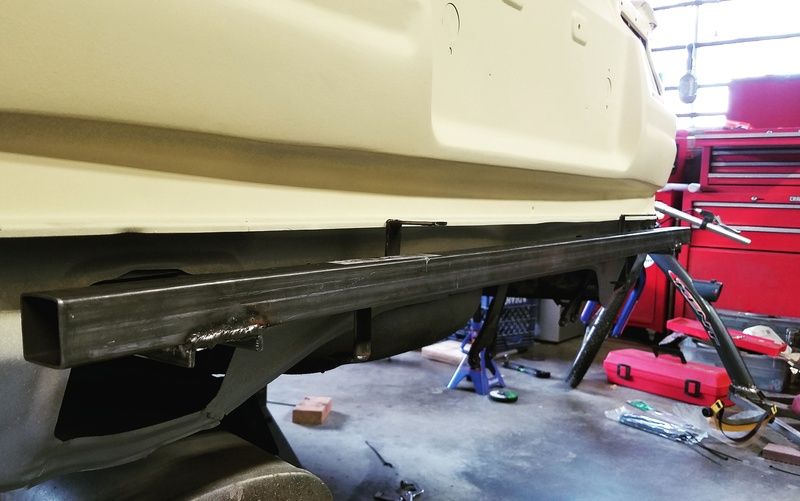
** UPDATE ** Made a bash bar to mount my rear bumper
Over the past couple of months, I have been pondering how to mount my kouki rear bumper to my AE86. earlier in this thread, I fab'ed up some homemade bumper brackets which worked, but were crudely thrown together and didn't sit as well as I had hoped. I liked the idea of a rear bash bar, but wanted to try my hand at making one of my own. Don't get me wrong, Danny from Swang Biz and other companies like Street Faction make TIG welded tube bash bars, that are great quality and probably offer a lot more "protection" in the event of a rear collision. They are professionals, I am not. This bar might be laughable to some, but the finished product works for me and I'm happy with it for now.
I wanted this bar to accomplish two things, assist in mounting the rear bumper and add a “little” additional protection to the Bumper. Assuming you have some tools and a little know how, this project is relatively easy for any DIY’er. I got lucky having access to a friends welder, and a cheap drill press. I would think the same thing could be accomplished with an electric drill and some creativity using extra nuts and bolts in the absence of a welder.
Please keep in mind, this is only a way of mounting the rear bumper and will not provide adequate protection in case of an accident. If you try to build your own bash bar, do so “at your own risk”. As with any DIY project, unfamiliarity with the tools and process can be dangerous.
The materials I used were purchased from Home Depot and a local hardware store, Dieruf Hardware:
Metal pieces (Home Depot):
1 - 1-1/4 in. x 1/16 in. x 48 in Plain Steel Square Tube price ea. $16.21
1 - 3/4 in. x 1.8 in. x 36 in. Plain Steel Flat Bar price ea. $4.21
1- 2 in. x 1/8 in. x 36 in. C-channel bar price ea. $14.97
Total(+ 6% sales tax): $37.51
Hardware (Dieruf Hardware Company):
2x – Item #: 73366-F price ea. $1.99
2x – Item #: 73365-E price ea. $1.89
4 – Item #: 73284-D price ea. $0.54
4 – Item #: 73708-H price ea. $0.25
4 – Item #: 73688-H price ea. $0.27
4 – Item #: 76126-F price ea. $0.75
Total (+ 6% sales tax): $15.90
Grand Total (excluding tools): $53.41 **Keep in mind I didn't use about half the material I purchased, so technically it could be even cheaper**
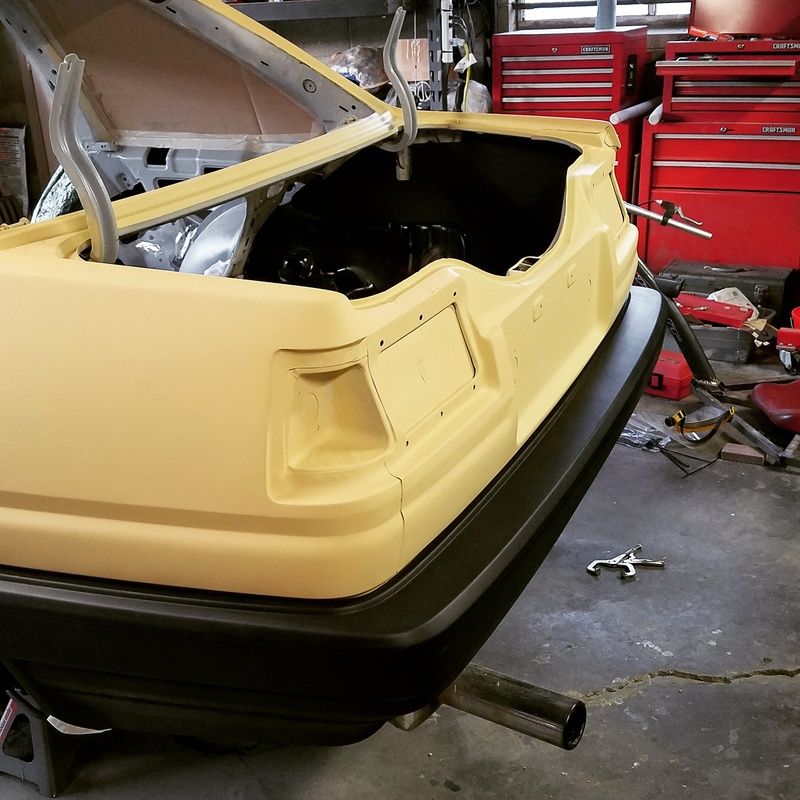
I did not take many pictures during the build, so I do not have many to post. I did however, make a video while building the bash bar, which I will embed at the bottom of this post. Below are some picture I do have, which show the completed bash bar as well as the rear bumper fitment.
Here is the Video:
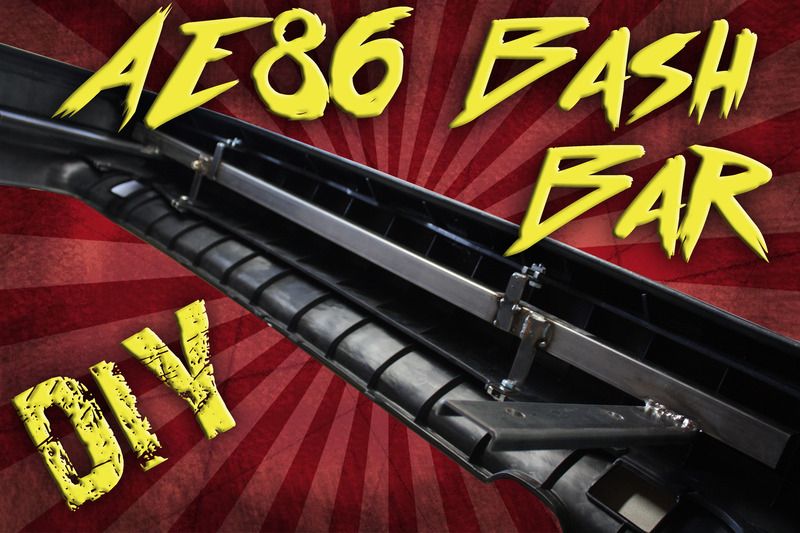
Now for the shameless self plug. I'm kinda feeling out this youtube thing and are trying to post video updates as well as pictures for this thread. If you like the video content feel free to subscribe to the channel and share the videos wherever. I'll be posting other projects I'm working on as well, but the AE86 will probably be the bulk of the content for a while. I will definitely keep this thread updated!
More updates to come!
Over the past couple of months, I have been pondering how to mount my kouki rear bumper to my AE86. earlier in this thread, I fab'ed up some homemade bumper brackets which worked, but were crudely thrown together and didn't sit as well as I had hoped. I liked the idea of a rear bash bar, but wanted to try my hand at making one of my own. Don't get me wrong, Danny from Swang Biz and other companies like Street Faction make TIG welded tube bash bars, that are great quality and probably offer a lot more "protection" in the event of a rear collision. They are professionals, I am not. This bar might be laughable to some, but the finished product works for me and I'm happy with it for now.
I wanted this bar to accomplish two things, assist in mounting the rear bumper and add a “little” additional protection to the Bumper. Assuming you have some tools and a little know how, this project is relatively easy for any DIY’er. I got lucky having access to a friends welder, and a cheap drill press. I would think the same thing could be accomplished with an electric drill and some creativity using extra nuts and bolts in the absence of a welder.
Please keep in mind, this is only a way of mounting the rear bumper and will not provide adequate protection in case of an accident. If you try to build your own bash bar, do so “at your own risk”. As with any DIY project, unfamiliarity with the tools and process can be dangerous.
The materials I used were purchased from Home Depot and a local hardware store, Dieruf Hardware:
Metal pieces (Home Depot):
1 - 1-1/4 in. x 1/16 in. x 48 in Plain Steel Square Tube price ea. $16.21
1 - 3/4 in. x 1.8 in. x 36 in. Plain Steel Flat Bar price ea. $4.21
1- 2 in. x 1/8 in. x 36 in. C-channel bar price ea. $14.97
Total(+ 6% sales tax): $37.51
Hardware (Dieruf Hardware Company):
2x – Item #: 73366-F price ea. $1.99
2x – Item #: 73365-E price ea. $1.89
4 – Item #: 73284-D price ea. $0.54
4 – Item #: 73708-H price ea. $0.25
4 – Item #: 73688-H price ea. $0.27
4 – Item #: 76126-F price ea. $0.75
Total (+ 6% sales tax): $15.90
Grand Total (excluding tools): $53.41 **Keep in mind I didn't use about half the material I purchased, so technically it could be even cheaper**
I did not take many pictures during the build, so I do not have many to post. I did however, make a video while building the bash bar, which I will embed at the bottom of this post. Below are some picture I do have, which show the completed bash bar as well as the rear bumper fitment.


Here is the Video:
Now for the shameless self plug. I'm kinda feeling out this youtube thing and are trying to post video updates as well as pictures for this thread. If you like the video content feel free to subscribe to the channel and share the videos wherever. I'll be posting other projects I'm working on as well, but the AE86 will probably be the bulk of the content for a while. I will definitely keep this thread updated!
More updates to come!
Re: A broke college kid, and his broken rolla...
Great work! Mucho rapecto

Re: A broke college kid, and his broken rolla...
This is so sick.
the DIY bash bar is cool too. Glad you actually mounted your bumper too, unlike the popular bash bar trend that's going on right now with the s-chassis crowd.
the DIY bash bar is cool too. Glad you actually mounted your bumper too, unlike the popular bash bar trend that's going on right now with the s-chassis crowd.
[I have no idea what I'm doing]
_____________________
instagram: @dacobjurbin
_____________________
instagram: @dacobjurbin
Re: A broke college kid, and his broken rolla...
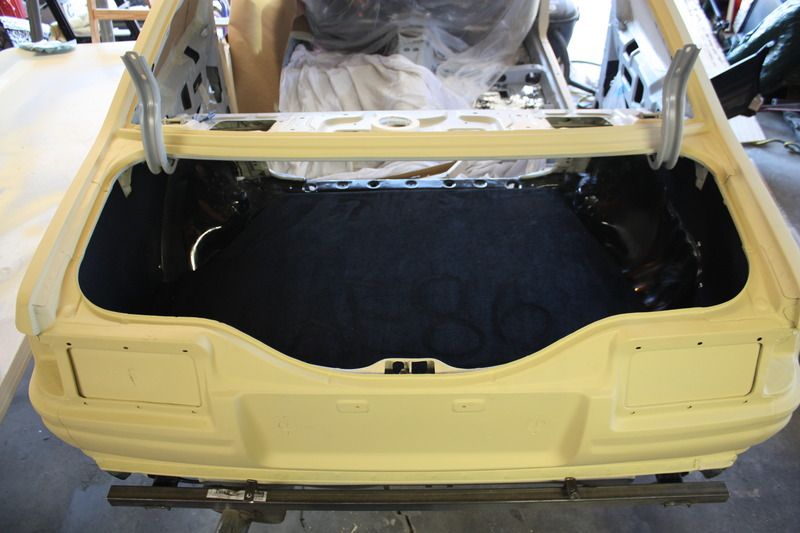
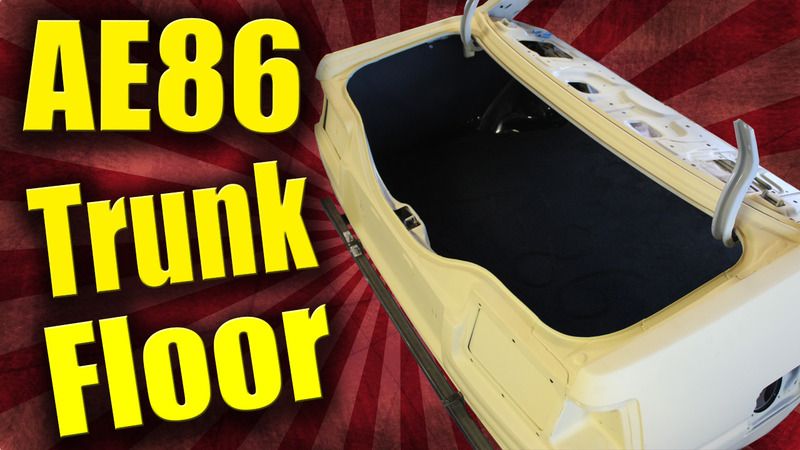
Did Some work the weekend before last. I decided to install my t3 trunk panels and make a "False Floor" for the trunk. I am very happy with the final result of the floor and now the trunk looks a lot better. Not to mention, the inner quarters are now protected from the inside as well.
Project Video:
More updates to come!

Project Video:
More updates to come!
Re: A broke college kid, and his broken rolla...
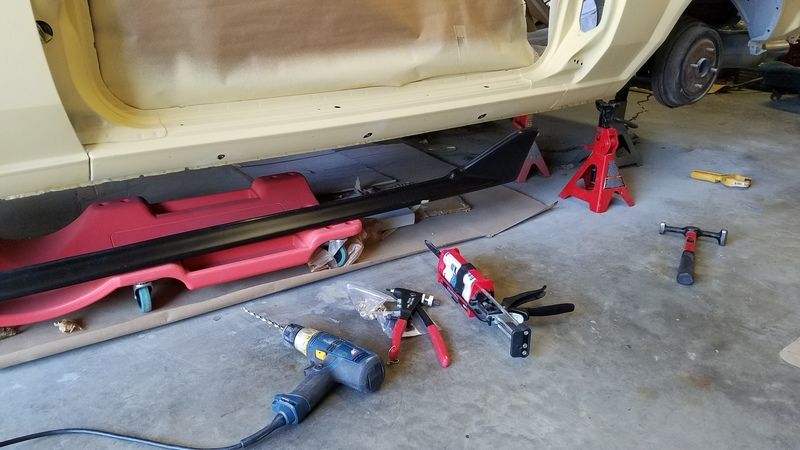
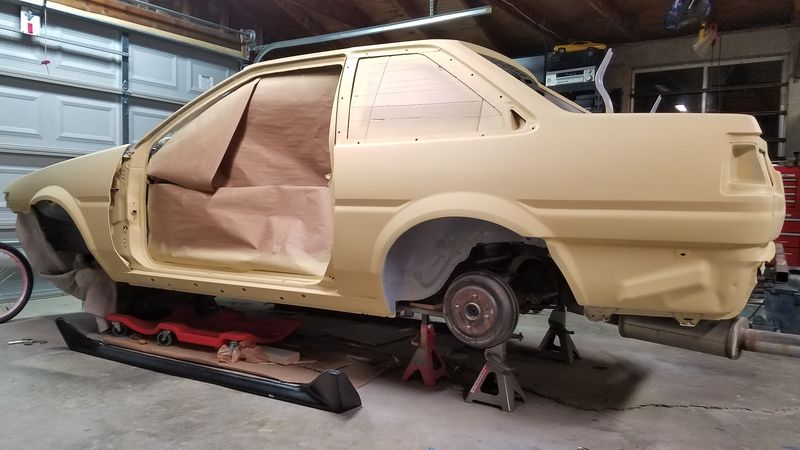
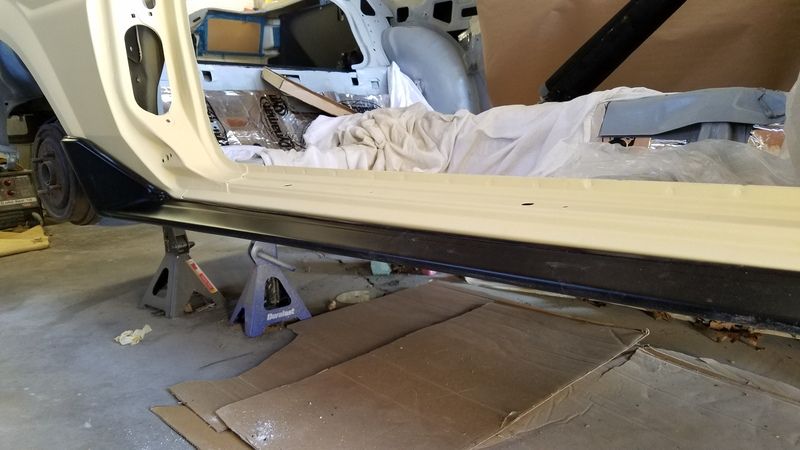
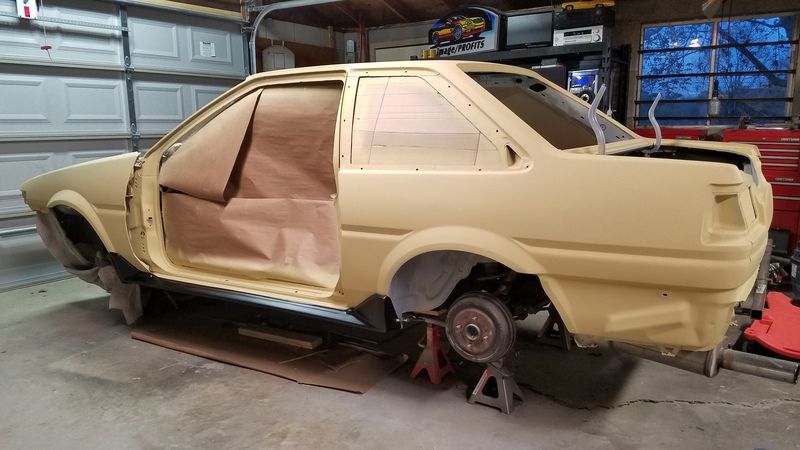
Hit a major point in the AE86 build. I finally was able to install my OEM Fiberglass side skirts from Retro-Spec. I am super excited how they turned out!! The only complaint I have, is that the end caps didn't seem to fit "right". I will be able to make them work, but i figured they would fit a little better then they do. Oh well, guess I will just have to modify them later down the road.
I used these things called "nutserts" to mount the side skirts. Basically, they are threaded inserts that are "crimped into sheet metal. This allows the side skirts to be 100% removable and swap-able with other skirts. An alternative option to self tappers or zip ties.
Pics and Video:
Here is the video of the installation, for any that are interested:
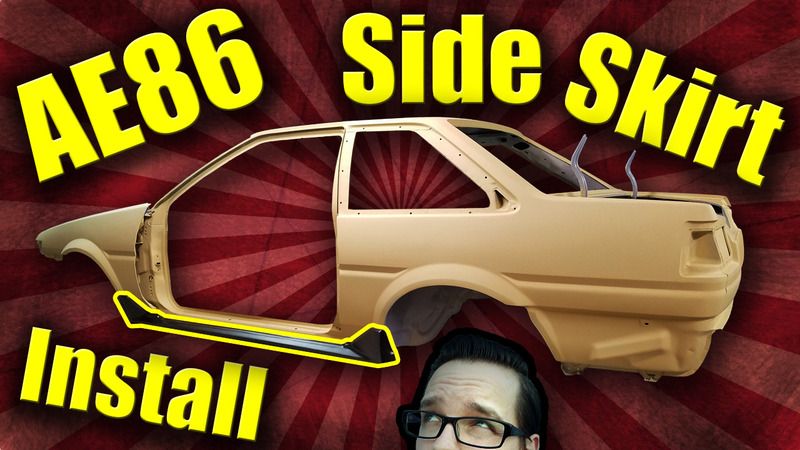
Last edited by EvoSolley on Tue Apr 18, 2017 12:55 pm, edited 1 time in total.
Re: A broke college kid, and his broken rolla...
Definitely watching this video later when I get off work.
The skirts on mine will need replacing here soon.
The skirts on mine will need replacing here soon.
[I have no idea what I'm doing]
_____________________
instagram: @dacobjurbin
_____________________
instagram: @dacobjurbin
Re: A broke college kid, and his broken rolla...
I'm a big nutsert fan, seemed to work out great for you too! I'm currently trying to figure out how to use them for the door panels I'm going to build.
Re: A broke college kid, and his broken rolla...
Hey bud
Loving the build so far 
Loving the build so far
Re: A broke college kid, and his broken rolla...
Thanks for all the replies everyone!
Got some work done on the 86, even though I kinda already worked on this piece earlier in the build. For anyone looking to "rebuild" their stock, disintegrating parcel shelf/ rear speaker shelf, or build one completely from scratch, here is how I did it. All the supplies you need are listed in the description. Let me know if anyone has any questions on the process or need help with anything This is a very easy project for any DIY'er.
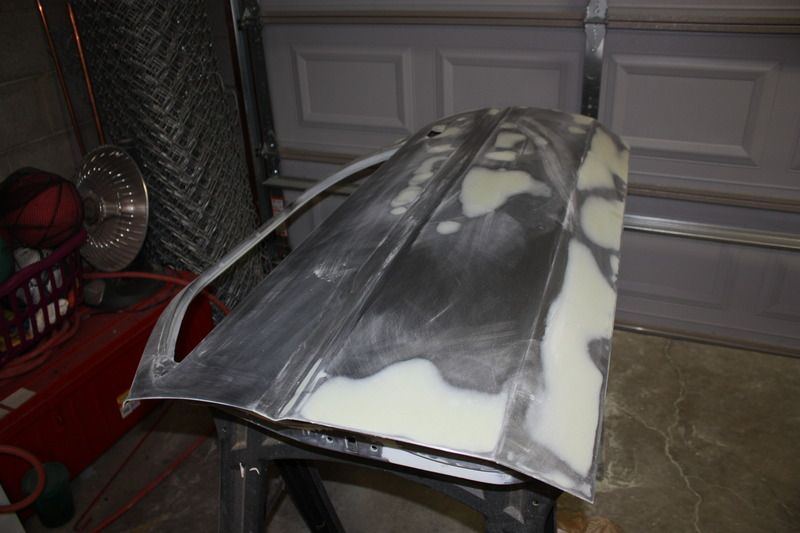
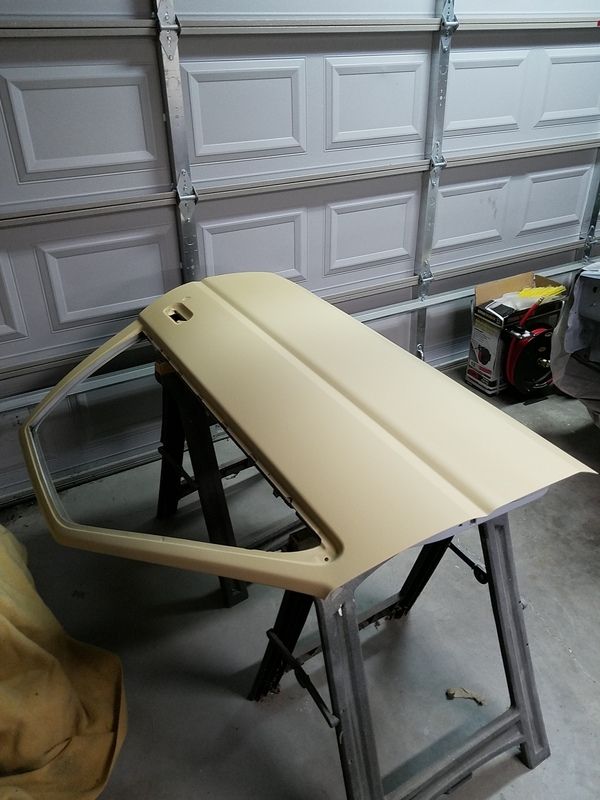
I'lll be working on the remaining door and trunk lid this weekend then get them in epoxy primer then high build. Once finished, I will hopefully be able to mount all the panels back on the car! Still a toss up if I want to go with a painted oem hood or save up for a carbon fiber one. Whatever the case, it is finally getting there!
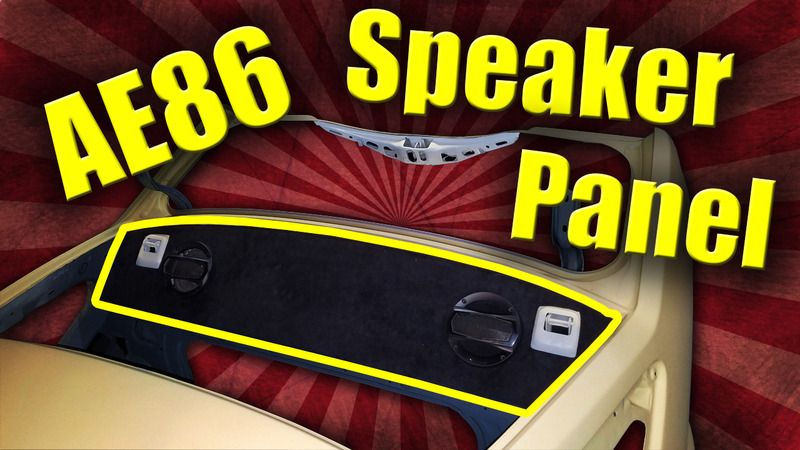
Got some work done on the 86, even though I kinda already worked on this piece earlier in the build. For anyone looking to "rebuild" their stock, disintegrating parcel shelf/ rear speaker shelf, or build one completely from scratch, here is how I did it. All the supplies you need are listed in the description. Let me know if anyone has any questions on the process or need help with anything
I'lll be working on the remaining door and trunk lid this weekend then get them in epoxy primer then high build. Once finished, I will hopefully be able to mount all the panels back on the car! Still a toss up if I want to go with a painted oem hood or save up for a carbon fiber one. Whatever the case, it is finally getting there!
Re: A broke college kid, and his broken rolla...
Hurry up and get this thing on the road so we can cruise around Louisville!!!
[I have no idea what I'm doing]
_____________________
instagram: @dacobjurbin
_____________________
instagram: @dacobjurbin
Re: A broke college kid, and his broken rolla...
Jayrdee wrote:Hurry up and get this thing on the road so we can cruise around Louisville!!!
Re: A broke college kid, and his broken rolla...
EvoSolley wrote:
Yes!! If you ever need an extra set of hands dude let me know and I'll make the drive up there. Can't do it this weekend or next, but I got nothing going on over the summer.
I've been craving Spinelli's anyways
[I have no idea what I'm doing]
_____________________
instagram: @dacobjurbin
_____________________
instagram: @dacobjurbin
Re: A broke college kid, and his broken rolla...
Jayrdee wrote:EvoSolley wrote:
Yes!! If you ever need an extra set of hands dude let me know and I'll make the drive up there. Can't do it this weekend or next, but I got nothing going on over the summer.
I've been craving Spinelli's anyways
For sure man, I'll hit you up sometime this summer. I'm sure I will need the extra set of hands at some point...**cough** Block Sanding **cough** lol
Bodywork has started on the remaining panels. I made a video, documenting the process I have used for each panel. It's a long process, but I think it is important to show the whole process for any DIY'ers out there. Hopefully it will all be worth it in the end!
Hope you all enjoy! More updates to come!