Thanks for checking out my issue.
jondee, the first link has good information about setting up the ECU, but I'm not at that point yet. The information there about the trigger sensor in the distributor is about a 24-1. Would 4-1 still work?
2nd link is a bit more confusing to me as it involves aluminum wheel with magnets in it. Interesting approach as it's spinning magnets instead of spinning gears.
yoshimitsuspeed, so does that mean these are reluctor sensors in the dizzy? do you know which one is which? or how I can figure that out when I don't have a running engine. It'd be nice to know what the trigger wheels are supposed to do.
Restoring AE86 w/ 4AGE 16v + HKS ITB + Haltech E6X
-
aceforever
- Club4AG Pro
- Posts: 637
- Joined: Sun Jan 18, 2015 11:36 am
- Location: Seattle, WA, USA

Re: Restoring AE86 w/ 4AGE 16v + HKS ITB + Haltech E6X
The pickups are reluctors, and they generate a small voltage when the tooth
passes the pickup. Because the voltages are very low, the wiring from the
distributor should be shielded and run clear of high voltage sources to avoid
electrical interference. When using the 4AGE distributor the setting of the
airgap is important to obtaining a clean reluctor signal.
The following diagram shows one way of filtering and conditioning the reluctor
output using the standard ignitor. This changes the waveforn from analog to
digital, and the ECU has to be set to Hall Effect sensor type.

There have been many, many sucessful installations of Haltech ECU's using the
triggers from 4AGE distributors. It appears to be a question of experimenting with
settings and wiring until a clean signal is obtained.
Cheers... jondee86
passes the pickup. Because the voltages are very low, the wiring from the
distributor should be shielded and run clear of high voltage sources to avoid
electrical interference. When using the 4AGE distributor the setting of the
airgap is important to obtaining a clean reluctor signal.
The following diagram shows one way of filtering and conditioning the reluctor
output using the standard ignitor. This changes the waveforn from analog to
digital, and the ECU has to be set to Hall Effect sensor type.
How Variable Reluctance Sensor works
The variable reluctance sensor consists of a wire wrapped around a permanent
magnet. When the ferromagnetic material such as a flywheel tooth passes the
sensor the magnetic field is disrupted. Due to this an AC voltage is generated,
the amplitude and frequency of which depends on the speed of the flywheel.
Here the polarity of the voltage is not important. The amplitude of this AC voltage
also depends on the air gap i.e. the distance between the sensor and the flywheel
tooth. The voltage decreases as the air gap increases and the voltage increases
as air gap decreases. Since the amplitude depends on the speed and also the air
gap, correct setting of the air gap is very important when measuring lower speeds.
This AC signal from the sensor can be processed further to obtain the digital output.
The variable Reluctance sensors are called as passive sensors since they don’t need
external power supply for their operation.
There have been many, many sucessful installations of Haltech ECU's using the
triggers from 4AGE distributors. It appears to be a question of experimenting with
settings and wiring until a clean signal is obtained.
Cheers... jondee86
The reasonable man adapts himself to the world; the unreasonable one
persists in trying to adapt the world to himself. Therefore, all progress
depends on the unreasonable man.
persists in trying to adapt the world to himself. Therefore, all progress
depends on the unreasonable man.
Re: Restoring AE86 w/ 4AGE 16v + HKS ITB + Haltech E6X
Thanks to Barry...
USDM 16v Bluetop:
- 4 wires, (2 per each green connector. Total of 2 green connectors)
- 2 wires that come from your distributor to the ignitor are your Ne+/- wires.
They are the sensor wires that read the 4 tooth engine synchronization wheel.
- 2 wires that plug into your factory harness from the distributor. These are
your G+/- wires. They are the wires that sense your 1 tooth engine home
synchronization wheel.
Cheers... jondee86
USDM 16v Bluetop:
- 4 wires, (2 per each green connector. Total of 2 green connectors)
- 2 wires that come from your distributor to the ignitor are your Ne+/- wires.
They are the sensor wires that read the 4 tooth engine synchronization wheel.
- 2 wires that plug into your factory harness from the distributor. These are
your G+/- wires. They are the wires that sense your 1 tooth engine home
synchronization wheel.
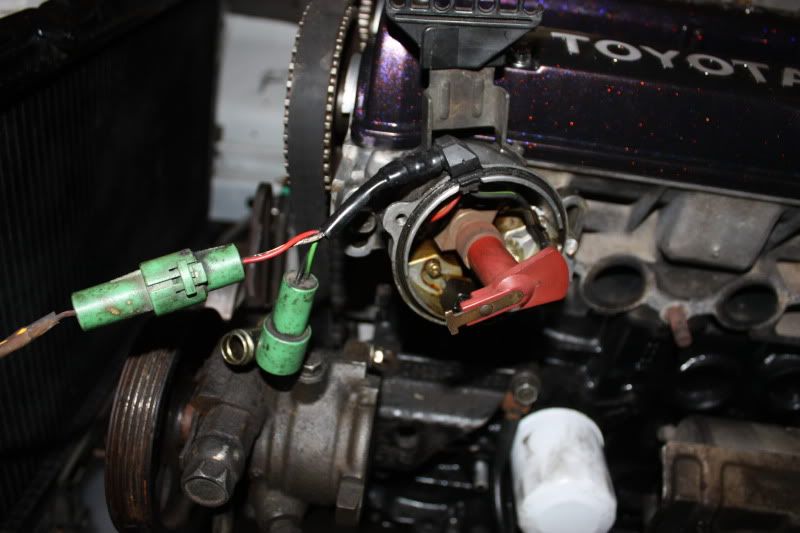
aceforever wrote:I've used a multimeter and it seems like the wires red and white has a circuit and black and green has a circuit. Is this normal?
EDIT:
Seems like from this picture:
It looks like white and red are one green plug, and green and black another. Does that mean when the gears hit the sensors/switches on the side of the distributor walls, they stop the circuit?
Cheers... jondee86
The reasonable man adapts himself to the world; the unreasonable one
persists in trying to adapt the world to himself. Therefore, all progress
depends on the unreasonable man.
persists in trying to adapt the world to himself. Therefore, all progress
depends on the unreasonable man.
-
aceforever
- Club4AG Pro
- Posts: 637
- Joined: Sun Jan 18, 2015 11:36 am
- Location: Seattle, WA, USA
Re: Restoring AE86 w/ 4AGE 16v + HKS ITB + Haltech E6X
Interesting. Okay, should I go get a battery and attempt to go through the "testing" portion of the Haltech manual to get to a point where I can test and get a clean signal? (btw I think I need battery mounting braces, it currently only has a metal bottom tray)
I still have not completely installed the fuel rail yet. I've just received the spacers and fuel filter that I ordered, however I still need to find a fuel line long enough that goes from the filter to the rail. Assuming the fuel in the tank is 8 years old, should I bleed the fuel lines? Should I also do an oil and coolant change before testing/dry cranking with the ECU?
I still have not completely installed the fuel rail yet. I've just received the spacers and fuel filter that I ordered, however I still need to find a fuel line long enough that goes from the filter to the rail. Assuming the fuel in the tank is 8 years old, should I bleed the fuel lines? Should I also do an oil and coolant change before testing/dry cranking with the ECU?
Re: Restoring AE86 w/ 4AGE 16v + HKS ITB + Haltech E6X
aceforever wrote:the first link has good information about setting up the ECU, but I'm not
at that point yet. The information there about the trigger sensor in the
distributor is about a 24-1. Would 4-1 still work?
The principle is exactly the same. However, there may be some differences
in how you set up the trigger angles in the ECU.
2nd link is a bit more confusing to me as it involves aluminum wheel with
magnets in it. Interesting approach as it's spinning magnets instead of
spinning gears.
You should have skipped past that bit
down... the bit about the Megasquirt VR signal conditioner.
Cheers... jondee86
The reasonable man adapts himself to the world; the unreasonable one
persists in trying to adapt the world to himself. Therefore, all progress
depends on the unreasonable man.
persists in trying to adapt the world to himself. Therefore, all progress
depends on the unreasonable man.
-
aceforever
- Club4AG Pro
- Posts: 637
- Joined: Sun Jan 18, 2015 11:36 am
- Location: Seattle, WA, USA
Re: Restoring AE86 w/ 4AGE 16v + HKS ITB + Haltech E6X
jondee86 wrote:Thanks to Barry...
USDM 16v Bluetop:
- 4 wires, (2 per each green connector. Total of 2 green connectors)
- 2 wires that come from your distributor to the ignitor are your Ne+/- wires.
They are the sensor wires that read the 4 tooth engine synchronization wheel.
- 2 wires that plug into your factory harness from the distributor. These are
your G+/- wires. They are the wires that sense your 1 tooth engine home
synchronization wheel.
Cheers... jondee86
Ah wonderful! I did find this post, however I'm not sure which wires are which color.
So judging by the wiring diagram from Haltech, there are 6 wires for trigger input:
Ground, Trigger, Ground, Ground, Home, 13.8V INJ
Does Ne+/- go to Trigger and ground? And G+/- go to Home and Ground? With spare ground / 13.8V INJ left?
-
aceforever
- Club4AG Pro
- Posts: 637
- Joined: Sun Jan 18, 2015 11:36 am
- Location: Seattle, WA, USA
Re: Restoring AE86 w/ 4AGE 16v + HKS ITB + Haltech E6X
jondee86 wrote:You should have skipped past that bitWhat you needed to read was further
down... the bit about the Megasquirt VR signal conditioner.
Cheers... jondee86
Ah, seems like I need to learn some soldering and get a LM1815, some resistors and other things? this seems like a DIY EDIS, is that right?
-
aceforever
- Club4AG Pro
- Posts: 637
- Joined: Sun Jan 18, 2015 11:36 am
- Location: Seattle, WA, USA
Re: Restoring AE86 w/ 4AGE 16v + HKS ITB + Haltech E6X
Haha found another guy with Haltech E6X + 4+1 dizzy from the old forum archive.
http://forums.club4ag.com/zerothread?id=70545
I see someone familiar
He never replied back after his last question.
Doing some archaeology, and found that he posted about a "24+1+1 dizzy" http://forums.club4ag.com/zerothread?id=74053
I'm assuming he switched from 4+1 to the GZE Dizzy
EDIT:
He was trying to do 4+1 and coil on plugs though, so I guess that's why he couldn't?
Re: Restoring AE86 w/ 4AGE 16v + HKS ITB + Haltech E6X
This is for an E6K but I think it is relevant
http://www.hachiroku.net/forums/showthread.php?t=29651&page=2
Most of the threads on this topic contain a lot or misleading and erroneous
information. But you can pick up the odd clue here and there. In the end you
have to try and put it together the best you can using those clues to cut down
your "trial and error" phase
Cheers... jondee86
The reasonable man adapts himself to the world; the unreasonable one
persists in trying to adapt the world to himself. Therefore, all progress
depends on the unreasonable man.
persists in trying to adapt the world to himself. Therefore, all progress
depends on the unreasonable man.
-
aceforever
- Club4AG Pro
- Posts: 637
- Joined: Sun Jan 18, 2015 11:36 am
- Location: Seattle, WA, USA
Re: Restoring AE86 w/ 4AGE 16v + HKS ITB + Haltech E6X
I found a way to use the stock fuel line! I routed it through the gap between two ITB manifolds or is that the ITB adapter. Haha, either way, wish I thought of that sooner.

-
aceforever
- Club4AG Pro
- Posts: 637
- Joined: Sun Jan 18, 2015 11:36 am
- Location: Seattle, WA, USA
Re: Restoring AE86 w/ 4AGE 16v + HKS ITB + Haltech E6X
Also, I figured out which wires are which on the distributor using a multimeter and a waving a screwdriver around the VR sensors. RED/WHITE is the bottom sensor and GREEN/BLACK is the home sensor.
Reading this now.
jondee86 wrote:This is for an E6K but I think it is relevant
http://www.hachiroku.net/forums/showthread.php?t=29651&page=2
Reading this now.
-
aceforever
- Club4AG Pro
- Posts: 637
- Joined: Sun Jan 18, 2015 11:36 am
- Location: Seattle, WA, USA
Re: Restoring AE86 w/ 4AGE 16v + HKS ITB + Haltech E6X
aceforever wrote:Reading this now.
Oh my goodness, the guy was on the right track since he had a 4+1, then someone with 24+4 came along and told him to grind his 4 teeth trigger wheel lol.
-
aceforever
- Club4AG Pro
- Posts: 637
- Joined: Sun Jan 18, 2015 11:36 am
- Location: Seattle, WA, USA
Re: Restoring AE86 w/ 4AGE 16v + HKS ITB + Haltech E6X

So assuming what I found out with the multimeter and what he guy on that other forum suggested. I still need to overcome finding some connectors for the distributor wires. I don't want to hardwire them to the ECU harness. Any recommendations? Junk yard?
Re: Restoring AE86 w/ 4AGE 16v + HKS ITB + Haltech E6X
aceforever wrote:Assuming the fuel in the tank is 8 years old, should I bleed the fuel lines?
Should I also do an oil and coolant change before testing/dry cranking with
the ECU?
A lot depends on the storage conditions and climate. If the climate was inclined
towards cold and damp, you could strike a numbers of problems due to moisture.
- there could be condensation and corrosion in the gas tank.
- the fuel pump could have died.
- the clutch plate could be stuck to the flywheel.
- the gas could be a bit funky due to old age.
- you could have cooling system corrosion and/or and leaks (depends on inhibitor).
- your brake and clutch fluid will have sucked up moisture.
- the engine may be "stuck" from bore corrosion.
However, if the car was stored in a low humidity environment, you could be lucky.
I would suggest syphoning or otherwise draining the old fuel from the tank, and
see what it looks like. If it still looks like fuel, you are good. If it looks like rusty
rainwater, you have corrosion, and will need to drop the tank for cleaning.
Do a complete fluid flush/change and bleed on the brakes and clutch. Use a block
of wood under the pedals to stop the pedals going closer than 2" to the floor while
pumping new fluid. The master cylinders may well have some corrosion inside,
and that "might" save you from damaging the seals. Open the fill plug on the
rear axle and check that there is oil up to the level of the plug. Do the same with
the gearbox. If the oil level is OK, they can wait for servicing until later.
Pull the cam covers and dribble clean engine oil over the lobes and followers.
Pull the sparkplugs and put a generous squirt of any lightweight lubricant into
each cylinder. Let it sit for an hour and then turn the engine over with a socket
on the crankshaft pulley bolt. If it turns freely, give each cylinder another squirt,
and turn the engine over another dozen or so turns. Sit the plugs loosely in the
holes to stop spiders getting inside. By now you should have engine oil oozing
out around the camshafts.
Drain the engine oil, change the filter, and fill with any 10W30 or 10W40
mineral oil. You can put the fancy stuff in after the engine has run for a while.
Drain the coolant and refill with water/inhibitor or anti-freeze mix. Now all you
need to do is hook up the fuel and ignition systems, set the timing and fire her
up... easy
Cheers... jondee86
The reasonable man adapts himself to the world; the unreasonable one
persists in trying to adapt the world to himself. Therefore, all progress
depends on the unreasonable man.
persists in trying to adapt the world to himself. Therefore, all progress
depends on the unreasonable man.
Re: Restoring AE86 w/ 4AGE 16v + HKS ITB + Haltech E6X
aceforever wrote:
So assuming what I found out with the multimeter and what he guy on that other
forum suggested. I still need to overcome finding some connectors for the distributor
wires. I don't want to hardwire them to the ECU harness. Any recommendations?
The Haltech harness should have provided you with a nice shielded cable, so all
you need is to connect up the wires. If you want it to look professional, you could
find something suitable at the junkyard and make eight or more soldered and
shrink wrapped joins. Or you could just use crimp-on bullet connectors. They
will do the job, and if you use the connectors with the little rubber rain covers,
they will look the part.
Cheers... jondee86
The reasonable man adapts himself to the world; the unreasonable one
persists in trying to adapt the world to himself. Therefore, all progress
depends on the unreasonable man.
persists in trying to adapt the world to himself. Therefore, all progress
depends on the unreasonable man.
-
aceforever
- Club4AG Pro
- Posts: 637
- Joined: Sun Jan 18, 2015 11:36 am
- Location: Seattle, WA, USA
Re: Restoring AE86 w/ 4AGE 16v + HKS ITB + Haltech E6X
jondee86 wrote:The Haltech harness should have provided you with a nice shielded cable, so all
you need is to connect up the wires. If you want it to look professional, you could
find something suitable at the junkyard and make eight or more soldered and
shrink wrapped joins. Or you could just use crimp-on bullet connectors. They
will do the job, and if you use the connectors with the little rubber rain covers,
they will look the part.
Cheers... jondee86
http://www.amazon.com/Yiding-Waterproof ... connectors
These seem good enough. I feel bad for not using stock connectors, but it's definitely easier to use these.
-
aceforever
- Club4AG Pro
- Posts: 637
- Joined: Sun Jan 18, 2015 11:36 am
- Location: Seattle, WA, USA
Re: Restoring AE86 w/ 4AGE 16v + HKS ITB + Haltech E6X
jondee86 wrote:A lot depends on the storage conditions and climate. If the climate was inclined
towards cold and damp, you could strike a numbers of problems due to moisture.
- there could be condensation and corrosion in the gas tank.
- the fuel pump could have died.
- the clutch plate could be stuck to the flywheel.
- the gas could be a bit funky due to old age.
- you could have cooling system corrosion and/or and leaks (depends on inhibitor).
- your brake and clutch fluid will have sucked up moisture.
- the engine may be "stuck" from bore corrosion.
The car was stored in california / washington. Washington is pretty humid and cold in the winters. It was in California for a little bit but not sure how many years.
I'll have to syphon the fuel tank to see what's up in there. Opening up the fuel filler cap I see some surface rust.

I'm guessing I can check what's up with the fuel pump by turning the ignition switch to acc/on, and see if there's any fuel coming out of the fuel filter?
Can't really tell what's up with the clutch until we start it up and drive it or take the tranny off.
Cooling system definitely has issues. A friend of mine had a radiator pressure device that pumps pressure into the system. Water started to come out near the top radiator connection. I bought a Mishimoto aluminum radiator and new OEM hoses, will need to find some hose fasteners though.

I really hope there's no bore corrosion and engine is free. I guess only way to check is crank with a socket wrench.
jondee86 wrote:However, if the car was stored in a low humidity environment, you could be lucky.
I would suggest syphoning or otherwise draining the old fuel from the tank, and
see what it looks like. If it still looks like fuel, you are good. If it looks like rusty
rainwater, you have corrosion, and will need to drop the tank for cleaning.
Do a complete fluid flush/change and bleed on the brakes and clutch. Use a block
of wood under the pedals to stop the pedals going closer than 2" to the floor while
pumping new fluid. The master cylinders may well have some corrosion inside,
and that "might" save you from damaging the seals. Open the fill plug on the
rear axle and check that there is oil up to the level of the plug. Do the same with
the gearbox. If the oil level is OK, they can wait for servicing until later.
Pull the cam covers and dribble clean engine oil over the lobes and followers.
Pull the sparkplugs and put a generous squirt of any lightweight lubricant into
each cylinder. Let it sit for an hour and then turn the engine over with a socket
on the crankshaft pulley bolt. If it turns freely, give each cylinder another squirt,
and turn the engine over another dozen or so turns. Sit the plugs loosely in the
holes to stop spiders getting inside. By now you should have engine oil oozing
out around the camshafts.
Drain the engine oil, change the filter, and fill with any 10W30 or 10W40
mineral oil. You can put the fancy stuff in after the engine has run for a while.
Drain the coolant and refill with water/inhibitor or anti-freeze mix. Now all you
need to do is hook up the fuel and ignition systems, set the timing and fire her
up... easy
Cheers... jondee86
I'm thinking clutch / brakes shouldn't need flushing until I want to start driving it around right? I'll hold off on that part. I bought some Castrol GTX 10W30, but I guess I should have gone cheaper lol.
I also bought a new thermostat and was going to replace the radiator. Should I do this before first engine run?
Thanks again!
-
aceforever
- Club4AG Pro
- Posts: 637
- Joined: Sun Jan 18, 2015 11:36 am
- Location: Seattle, WA, USA
Re: Restoring AE86 w/ 4AGE 16v + HKS ITB + Haltech E6X

Do you know what this? I probably should replace the filter in here too right? I probably need one for the valve cover hole as well.
Something like this:
What are these things called? I know that hole connects to the intake manifold when it's stock.
Re: Restoring AE86 w/ 4AGE 16v + HKS ITB + Haltech E6X
You could use these...

Saves all the splicing of wires that you have to do with those fancy ones !!
You will find a lot of other places to use them as you work on the car. And
get a crimping tool that punches a dimple into the ferrule... not one that
just trys to squeeze the ferrule flat.
Cheers... jondee86
Saves all the splicing of wires that you have to do with those fancy ones !!
You will find a lot of other places to use them as you work on the car. And
get a crimping tool that punches a dimple into the ferrule... not one that
just trys to squeeze the ferrule flat.
Cheers... jondee86
The reasonable man adapts himself to the world; the unreasonable one
persists in trying to adapt the world to himself. Therefore, all progress
depends on the unreasonable man.
persists in trying to adapt the world to himself. Therefore, all progress
depends on the unreasonable man.
Re: Restoring AE86 w/ 4AGE 16v + HKS ITB + Haltech E6X
aceforever wrote:
Do you know what this?
That thing is the thermostatic idle-up valve that usually is bolted to the
underside of the OEM single throttlebody. It has been surgically removed
and grafted onto some kind of custom manifold block. Hot water from the
engine cooling system circulates around the valve causing it to close as
the engine warms up. When cold, it is open and allows extra air into the
engine to raise the cold idle speed. As the engine warms up the valve
greadually closes bringing the idle down to normal warm idle.
The filter is there to stop dirt getting sucked into the engine. Cleaning
it can wait. The other little cone filter is there to catch the oil getting
blown out the cam cover vent. When it has caught enough it will dribble
it down the outside of your engine. You can do without one for now, and
when the engine is running, you can look at installing a catch can.
If the old radiator still holds water, you can leave it in place. Once you
have the engine running, replace the radiator, thermostat and coolant.
Cheers... jondee86
The reasonable man adapts himself to the world; the unreasonable one
persists in trying to adapt the world to himself. Therefore, all progress
depends on the unreasonable man.
persists in trying to adapt the world to himself. Therefore, all progress
depends on the unreasonable man.
-
aceforever
- Club4AG Pro
- Posts: 637
- Joined: Sun Jan 18, 2015 11:36 am
- Location: Seattle, WA, USA
Re: Restoring AE86 w/ 4AGE 16v + HKS ITB + Haltech E6X
Awesome. So I'll leave those as is for now.
Yesterday I hooked up a brand new red top battery (still need to find a way to tie it down as the original tray and brackets are gone) and the lights were turned on. The lights popped and it scared the hell out of me!
Anyways, I got a syphon and tried to get fuel out of the fuel tank. Nothing was in there, the fuel gauge indicates almost empty, maybe a notch below the lowest one. And the syphon had some yellowish residue on it. I'm guessing the edge of the metal tube that goes to the fuel tank has fuel residue? Where can I find schematics on how the fuel tank pump is wired up so I can test that? Should I make it pump to a container just to see if it works first before doing the full fuel rail?
Re: Restoring AE86 w/ 4AGE 16v + HKS ITB + Haltech E6X
On the floor of the trunk there are some wires that go down to
the fuel tank thru a small screwed down access plate. Some of the
wires are for the fuel level sender and some are for the fuel pump.
There should be connectors there that you can unplug for testing.
I believe that the fuel pump wires are blue/black (12V supply) and
white/black (ground). The ground is shared with the gauge sender.
Power to the pump usually comes from the Circuit Opening Relay
(COR) located high above the junction box in the passenger side
kick panel. You will have to back track from the tank. At the COR
the wire for the pump "should" be blue/red.
You will need to put a couple of gallons of gas in the tank to test
the pump. If the fuel evaporated, it is probably a bit crusty in
there, and if the pump runs you will want to flush the line thru as
far as the filter. Keep an extinguisher handy !!!
Cheers... jondee86
The reasonable man adapts himself to the world; the unreasonable one
persists in trying to adapt the world to himself. Therefore, all progress
depends on the unreasonable man.
persists in trying to adapt the world to himself. Therefore, all progress
depends on the unreasonable man.
-
yoshimitsuspeed
- Club4AG MASTER
- Posts: 2084
- Joined: Sun Jan 13, 2013 1:18 pm
- Contact:
Re: Restoring AE86 w/ 4AGE 16v + HKS ITB + Haltech E6X
Agree with everything that jondee86 said but if the tank is empty this would be your best oppertunity to pull it out, clean it and test the fuel pump out of the car. Or even just replace it. It has been known for fuel pumps to work for a little while then fail shortly after. Could be worth throwing a new one in just for peace of mind.
-
aceforever
- Club4AG Pro
- Posts: 637
- Joined: Sun Jan 18, 2015 11:36 am
- Location: Seattle, WA, USA
Re: Restoring AE86 w/ 4AGE 16v + HKS ITB + Haltech E6X
I checked out the tank through the fuel level sender and it seems clean. There's still a bit of fuel in there and it looks like yellow tinted liquid (like what gasoline looks like?) I think I'll leave it as is for now and probably replace the pump later. if it works.
I'm trying to figure out where the +12 v supply from ignition switch is, and where the +12v supply to pump is for the ECU hookup. I checked out the passenger side glove box part like you said. Is it this?

The pump connects to a blue/red connector in the trunk.
I'm trying to figure out where the +12 v supply from ignition switch is, and where the +12v supply to pump is for the ECU hookup. I checked out the passenger side glove box part like you said. Is it this?
The pump connects to a blue/red connector in the trunk.
Re: Restoring AE86 w/ 4AGE 16v + HKS ITB + Haltech E6X
http://www.rollaclub.com/wiki/index.php?title=Circuit_Opening_Relay_Wiring
Looks like you found it... can't always rely on the colours of the wires being
the same as the wiring diagram Best to verify by testing with your meter.
Immediately behind the engine and high on the firewall, there is a big, black
squarish connector. In the standard factory wiring that plug was the interface
between the dash harness and the engine harness. It contained the key-
switched power supply for the injectors and ignition. It also contained the
tacho and oil pressure signals for the dash, and the controls for the wipers
plus a few other things I can't remember offhand.
Since your wiring has been "customised" you will need to see what, if any,
of these functions still pass thru that plug.
Cheers... jondee86
Looks like you found it... can't always rely on the colours of the wires being
the same as the wiring diagram
Immediately behind the engine and high on the firewall, there is a big, black
squarish connector. In the standard factory wiring that plug was the interface
between the dash harness and the engine harness. It contained the key-
switched power supply for the injectors and ignition. It also contained the
tacho and oil pressure signals for the dash, and the controls for the wipers
plus a few other things I can't remember offhand.
Since your wiring has been "customised" you will need to see what, if any,
of these functions still pass thru that plug.
Cheers... jondee86
The reasonable man adapts himself to the world; the unreasonable one
persists in trying to adapt the world to himself. Therefore, all progress
depends on the unreasonable man.
persists in trying to adapt the world to himself. Therefore, all progress
depends on the unreasonable man.
-
aceforever
- Club4AG Pro
- Posts: 637
- Joined: Sun Jan 18, 2015 11:36 am
- Location: Seattle, WA, USA
Re: Restoring AE86 w/ 4AGE 16v + HKS ITB + Haltech E6X
Great! How do I test a long piece of wire like that? Connect one side to ground and try to connect the loop by finding another ground near the other side?
I'm trying to understand the COR. On the wire diagram you linked, I see +12v ignition switched. Can I use that for the Fuel Pump Relay / Main Power Relay on the Haltech Engine Harness?
Is the COR a relay for the OEM ECU and gets replaced by the relays on the Haltech Engine harness?
Am I reading the haltech diagram correctly? http://www.haltech.com/wp-content/uploads/2011/01/e6x_wiring_diagram.pdf
I'm guessing the COR does something similar? Like +12v goes to ground, and in turn something happens to the other wires?
I'm trying to understand the COR. On the wire diagram you linked, I see +12v ignition switched. Can I use that for the Fuel Pump Relay / Main Power Relay on the Haltech Engine Harness?
Is the COR a relay for the OEM ECU and gets replaced by the relays on the Haltech Engine harness?
Am I reading the haltech diagram correctly? http://www.haltech.com/wp-content/uploads/2011/01/e6x_wiring_diagram.pdf
Haltech E6X Diagram wrote:Fuel Pump Relay
[Battery +] -> [Pump +] only if [Switched +] -> [ECU Pump Trigger pin]
Main Power Relay
[ECU pins to Battery] -> [Battery +] only if [Switched +] -> [Ground]
I'm guessing the COR does something similar? Like +12v goes to ground, and in turn something happens to the other wires?
rollaclub wrote:White/Black - Wires to to STA - Starter/ECU Start Signal.
White/Red - Wires to EFI Relay - +12v Ignition Switched power (Run through a suitably sized fuse, 10A is usually fine, but depends on your fuel pump).
Green - Wires to engine run signal - "FC" pin on 4AGE ECU. Or if you are running an AFM engine, this wire should connect to the AFM.
Black - Wires to body earth - Wire to closest earth point.
Blue/Black - Wire to fuel pump positive - Gives power to your fuel pump.
Re: Restoring AE86 w/ 4AGE 16v + HKS ITB + Haltech E6X
You surmise correctly. Fundamentally, this is how the COR works...

There is one set of contacts that close to supply 12V to the fuel pump.
This set of contacts may be operated by either of two relay coils. One
coil is energised while the engine is cranking (and only when the engine
is cranking) and the other set is energised by the ECU or AFM once the
engine has fired up and you have let go of the key. The COR is a safety
feature designed to turn off the fuel pump if the engine is not running.
The way I read it, the Haltech ECU is powered up from the Main Power
Relay which in turn is energised by the key switch. When the ECU powers
up it will (usually) energise the Fuel Pump Relay for a couple of seconds
to prime the fuel system. It will then (most likely) wait until it sees a
rpm signal from the distributor before energising the pump again. This
should be detailed in the manual somewhere, and again, for safety
reasons, in the event that the ECU does not get an rpm signal, it will
de-energise the FP..
Cheers... jondee86
The reasonable man adapts himself to the world; the unreasonable one
persists in trying to adapt the world to himself. Therefore, all progress
depends on the unreasonable man.
persists in trying to adapt the world to himself. Therefore, all progress
depends on the unreasonable man.
-
aceforever
- Club4AG Pro
- Posts: 637
- Joined: Sun Jan 18, 2015 11:36 am
- Location: Seattle, WA, USA
Re: Restoring AE86 w/ 4AGE 16v + HKS ITB + Haltech E6X
Awesome, thanks for that diagram. Looks like there's a resistor on the STA -> GND on the COR while the Haltech wiring harness does not have a resistor. Does that mean the haltech harness will draw more power? Or does the Bosch Relay or equivalent already have a built in resistor?
So I'm guessing this means I can tap into that IG+ for the Haltech ECU instead of the OEM ECU. Is this right?
So I'm guessing this means I can tap into that IG+ for the Haltech ECU instead of the OEM ECU. Is this right?
Re: Restoring AE86 w/ 4AGE 16v + HKS ITB + Haltech E6X
I've never used a resistor with a relay. AFAIK the coil resistance
should be sufficient to limit current, and yeah, if one was required
by the relay it would be inside
The key-switched power supply should only be available when the
key is in the ON position (or cranking). Try and locate a wire that
would originally have gone to the coil/igniter or to the injectors.
Either of these will be fine for controlling the Haltech relays.
Cheers... jondee86
The reasonable man adapts himself to the world; the unreasonable one
persists in trying to adapt the world to himself. Therefore, all progress
depends on the unreasonable man.
persists in trying to adapt the world to himself. Therefore, all progress
depends on the unreasonable man.
-
aceforever
- Club4AG Pro
- Posts: 637
- Joined: Sun Jan 18, 2015 11:36 am
- Location: Seattle, WA, USA
Re: Restoring AE86 w/ 4AGE 16v + HKS ITB + Haltech E6X
I'll have to hunt for those wires then haha.
Sanded and polished up the fuel rail and got spacers in there.


Fuel Pressure regulator should connect to something right? Does it connect to a black can that's next to the fuel filter?
Also there's something below the ITBs that look like it should connect to a hose to something.
Sanded and polished up the fuel rail and got spacers in there.
Fuel Pressure regulator should connect to something right? Does it connect to a black can that's next to the fuel filter?
Also there's something below the ITBs that look like it should connect to a hose to something.