
The outlet tube from the FPR connects to the fuel return hose. That's a
short rubber hose that joins to the fuel return hard line, and fixes to the
FPR with a spring clip (maybe wormdrive hose clamp).
Your pics show the HKS Vacuum tank attached to the inner guard. There
will be a rubber hose from under each ITB inlet runner to a fitting on the
end of the tank. On top of the tank is a black fitting with 2 or 3 nipples
on top. One of these nipples will connect to the FPR. Another one will
be connected to the MAP sensor.
The larger hose next to the black fitting is most likely the brake booster
vacuum connection, and connects to the booster via a hose with a one-way
valve inserted about halfway along the hose.
There also appears to be a hose connected to the side of the vacuum
tank that connects to the "remote" thermostatic idle-up valve assembly.
Theoretically (as I have never seen it done exactly like that) this could
introduce idle air to the ITB's via the vacuum sensing hoses.
Cheers... jondee86
Restoring AE86 w/ 4AGE 16v + HKS ITB + Haltech E6X
Re: Restoring AE86 w/ 4AGE 16v + HKS ITB + Haltech E6X
The reasonable man adapts himself to the world; the unreasonable one
persists in trying to adapt the world to himself. Therefore, all progress
depends on the unreasonable man.
persists in trying to adapt the world to himself. Therefore, all progress
depends on the unreasonable man.
Re: Restoring AE86 w/ 4AGE 16v + HKS ITB + Haltech E6X
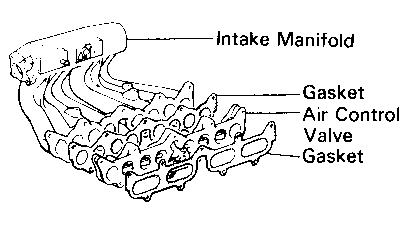
Looking at your pics it appears that the engine still has the TVIS plate
installed. This bit....
The TVIS plate contains a set of butterflys that can be closed at low
rpm to increase inlet air velocity, and opened at higher rpm's to allow
greater inlet flow. It is designed for use with the OEM 8-runner inlet
manifold. And without knowing the design of the HKS manifold, I can't
say if will be a help or a hinderance with your setup.
The TVIS buterflys are operated by a vacuum servo under the control
of a solenoid valve actuated by the OEM ECU at around 4200rpm. The
Haltech should be able to switch the solenoid with an AUX ouput.
Cheers... jondee86
The reasonable man adapts himself to the world; the unreasonable one
persists in trying to adapt the world to himself. Therefore, all progress
depends on the unreasonable man.
persists in trying to adapt the world to himself. Therefore, all progress
depends on the unreasonable man.
-
aceforever
- Club4AG Pro
- Posts: 637
- Joined: Sun Jan 18, 2015 11:36 am
- Location: Seattle, WA, USA
Re: Restoring AE86 w/ 4AGE 16v + HKS ITB + Haltech E6X
jondee86 wrote:Looking at your pics it appears that the engine still has the TVIS plate
installed. This bit....
The TVIS plate contains a set of butterflys that can be closed at low
rpm to increase inlet air velocity, and opened at higher rpm's to allow
greater inlet flow. It is designed for use with the OEM 8-runner inlet
manifold. And without knowing the design of the HKS manifold, I can't
say if will be a help or a hinderance with your setup.
The TVIS buterflys are operated by a vacuum servo under the control
of a solenoid valve actuated by the OEM ECU at around 4200rpm. The
Haltech should be able to switch the solenoid with an AUX ouput.
Cheers... jondee86
You're right!!
It's funny, I saw another TVIS plate in the spare parts bin in the trunk. I wasn't expecting two of them!
The previous owner plugged the little bypass valve between 2 and 3rd hole in your picture. Is that the idle bypass?
It could be that this was just for spacing out the HKS manifold out more so that the fuel rail can fit in between the manifold and cylinder head since the valves stay open by default.
I could always test that part later on right? From what I read the TVIS helps out with lower RPM, does it hinder it much if it stays open?
Thanks!
Re: Restoring AE86 w/ 4AGE 16v + HKS ITB + Haltech E6X
The port that is plugged in the TVIS plate is the vacuum source for the
TVIS vacuum reservoir. There needs to be some reserve vacuum to hold
the butterflys closed for starting.
It is not unusual to use the TVIS plate as a spacer with the standard single-
throttle RWD intake manifold. In most cases the butterflys and spindle are
removed and all the resulting holes blocked with JB Weld or similar. In your
case I saw that the servo actuator was in place, but the vacuum reservoir
and solenoid valve were in your loose parts. So as you say, it is inactive
with the butterflies in the open position.
If the intake runners on the HKS manifold are a single elongated circle as
per the intake gasket in this pic and the intake ports on the 4AGE head...
... then the double circles of the TVIS plate are a poor match and will be
a significant obstruction to flow. You would want to hog out the divider in
each port to obtain a smooth transition from manifold to inlet port. This
is a purpose made item, but you get the idea

As to any gains to be had from an operating TVIS plate on your modified
engine setup ?? If you don't have an 8-port intake manifold, I would say
none. But once you have the engine running you can experiment.
Cheers... jondee86
TVIS vacuum reservoir. There needs to be some reserve vacuum to hold
the butterflys closed for starting.
It is not unusual to use the TVIS plate as a spacer with the standard single-
throttle RWD intake manifold. In most cases the butterflys and spindle are
removed and all the resulting holes blocked with JB Weld or similar. In your
case I saw that the servo actuator was in place, but the vacuum reservoir
and solenoid valve were in your loose parts. So as you say, it is inactive
with the butterflies in the open position.
If the intake runners on the HKS manifold are a single elongated circle as
per the intake gasket in this pic and the intake ports on the 4AGE head...
... then the double circles of the TVIS plate are a poor match and will be
a significant obstruction to flow. You would want to hog out the divider in
each port to obtain a smooth transition from manifold to inlet port. This
is a purpose made item, but you get the idea
As to any gains to be had from an operating TVIS plate on your modified
engine setup ?? If you don't have an 8-port intake manifold, I would say
none. But once you have the engine running you can experiment.
Cheers... jondee86
The reasonable man adapts himself to the world; the unreasonable one
persists in trying to adapt the world to himself. Therefore, all progress
depends on the unreasonable man.
persists in trying to adapt the world to himself. Therefore, all progress
depends on the unreasonable man.
-
aceforever
- Club4AG Pro
- Posts: 637
- Joined: Sun Jan 18, 2015 11:36 am
- Location: Seattle, WA, USA
Re: Restoring AE86 w/ 4AGE 16v + HKS ITB + Haltech E6X
Ah thanks for the pointers. I was curious and took the itb off to see what the hks manifold looked like. For science!

Looks like a modified plate would definitely be better later on.
The hks manifold is just one big tube per cylinder.
There is a bunch of grease or soot inside the manifold. Should I clean that out at some point?
Looks like a modified plate would definitely be better later on.
The hks manifold is just one big tube per cylinder.
There is a bunch of grease or soot inside the manifold. Should I clean that out at some point?
Re: Restoring AE86 w/ 4AGE 16v + HKS ITB + Haltech E6X
aceforever wrote:There is a bunch of grease or soot inside the manifold. Should I clean
that out at some point?
Whenever you take something off an engine, or pick up a piece
to bolt on, it is a good idea to give it a clean. When you clean it
you get the chance to inspect for damage, and make sure that the
mating surfaces are smooth, flat and free of nicks and burrs.
Clean parts are more pleasant to work with, and look better when
the job is finished. Soot inside the inlet manifold is a sign that
your engine was not been happy in a prior life. Wipe out what you
can reach, but it is not critical to get it spotless
Cheers... jondee86
The reasonable man adapts himself to the world; the unreasonable one
persists in trying to adapt the world to himself. Therefore, all progress
depends on the unreasonable man.
persists in trying to adapt the world to himself. Therefore, all progress
depends on the unreasonable man.
-
aceforever
- Club4AG Pro
- Posts: 637
- Joined: Sun Jan 18, 2015 11:36 am
- Location: Seattle, WA, USA
Re: Restoring AE86 w/ 4AGE 16v + HKS ITB + Haltech E6X
I ended up disassembling all of the hks manifold.
I cleaned it by using sandpaper and wax and grease remover. It's tough work and took at least 3-4hours, any easier way?

The TVIS plate is pretty nasty and a bit of dark liquid at the gaskets.

The manifold grease is pretty thick and I'm having trouble getting it off even with the wax and grease remover. Seems like the gasket is for a 8 hole intake runner instead of the bigger holes on the hks manifold.

The head is also filthy

I cleaned it by using sandpaper and wax and grease remover. It's tough work and took at least 3-4hours, any easier way?
The TVIS plate is pretty nasty and a bit of dark liquid at the gaskets.
The manifold grease is pretty thick and I'm having trouble getting it off even with the wax and grease remover. Seems like the gasket is for a 8 hole intake runner instead of the bigger holes on the hks manifold.
The head is also filthy
Re: Restoring AE86 w/ 4AGE 16v + HKS ITB + Haltech E6X
There are two interpretations of "clean".
Mine covers the removal of all loose surface dirt, oil, grease and other crud.
I use carb cleaner, oil and grease remover and a stiff brush or piece of
scotchbrite. This leaves a clean, dry surface but does not remove surface
oxidation... so the parts tend to be grey rather than silver.
The other interpretation of "clean" covers bringing the part back to "as new"
or factory finish. This kind of finish is best accomplished by immersion in
an acid bath or chemically assisted hot wash processes, usually performed
by engine reconditioners.
At this stage of your restoration, I would suggest that clean and dry would
be adequate
Cheers... jondee86
The reasonable man adapts himself to the world; the unreasonable one
persists in trying to adapt the world to himself. Therefore, all progress
depends on the unreasonable man.
persists in trying to adapt the world to himself. Therefore, all progress
depends on the unreasonable man.
Re: Restoring AE86 w/ 4AGE 16v + HKS ITB + Haltech E6X
As far as the TVIS plate is concerned, if you have a spare one, you
could look at machining one to remove the septum between the ports
and then use a bigport intake gasket both sides of the plate. If you
go down this path, you should remove the butterflys and spindles
and block up the holes.
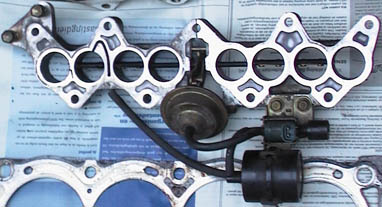
Looking at the third pic above, it seems that the ports in the HKS
manifold may not be an exact match for the 8-port gasket ? The marks
look like the gasket was intruding into the port on one side ? Minor
point, as while it is not worth trying to make the HKS ports smaller,
it would be worthwhile port matching if the HKS port was smaller
than the combined ports on the TVIS plate.
Cheers... jondee86
could look at machining one to remove the septum between the ports
and then use a bigport intake gasket both sides of the plate. If you
go down this path, you should remove the butterflys and spindles
and block up the holes.
Looking at the third pic above, it seems that the ports in the HKS
manifold may not be an exact match for the 8-port gasket ? The marks
look like the gasket was intruding into the port on one side ? Minor
point, as while it is not worth trying to make the HKS ports smaller,
it would be worthwhile port matching if the HKS port was smaller
than the combined ports on the TVIS plate.
Cheers... jondee86
The reasonable man adapts himself to the world; the unreasonable one
persists in trying to adapt the world to himself. Therefore, all progress
depends on the unreasonable man.
persists in trying to adapt the world to himself. Therefore, all progress
depends on the unreasonable man.
-
aceforever
- Club4AG Pro
- Posts: 637
- Joined: Sun Jan 18, 2015 11:36 am
- Location: Seattle, WA, USA
Re: Restoring AE86 w/ 4AGE 16v + HKS ITB + Haltech E6X
jondee86 wrote:As far as the TVIS plate is concerned, if you have a spare one, you
could look at machining one to remove the septum between the ports
and then use a bigport intake gasket both sides of the plate. If you
go down this path, you should remove the butterflys and spindles
and block up the holes.
I was thinking of drilling out the septum too, but upon closer inspection, there is just not enough on the 8port side to completely seal the manifold.
Techno toy tuning sells a tvis delete spacer. I'll probably need to get that for a proper fit.
Looking at the third pic above, it seems that the ports in the HKS
manifold may not be an exact match for the 8-port gasket ? The marks
look like the gasket was intruding into the port on one side ? Minor
point, as while it is not worth trying to make the HKS ports smaller,
it would be worthwhile port matching if the HKS port was smaller
than the combined ports on the TVIS plate.
Cheers... jondee86
I'll check this tonight. It looked like it'd match up with the bigport gasket, but I'll check.
-
aceforever
- Club4AG Pro
- Posts: 637
- Joined: Sun Jan 18, 2015 11:36 am
- Location: Seattle, WA, USA
Re: Restoring AE86 w/ 4AGE 16v + HKS ITB + Haltech E6X

The manifold's runners are exactly the size of a big port head since the gaskets are the same size.
Yesterday, I was trying to align the folding headlight assembly, but one of the bolt head snapped off because the frame is rusted around it.
Re: Restoring AE86 w/ 4AGE 16v + HKS ITB + Haltech E6X
Looks like the T3 TVIS delete plate would be the way to go then.
You will find in due course, that, just as all food tastes better with
sweet Thai Chilli Sauce, all bolts and nuts need WD40
Cheers... jondee86
You will find in due course, that, just as all food tastes better with
sweet Thai Chilli Sauce, all bolts and nuts need WD40
Cheers... jondee86
The reasonable man adapts himself to the world; the unreasonable one
persists in trying to adapt the world to himself. Therefore, all progress
depends on the unreasonable man.
persists in trying to adapt the world to himself. Therefore, all progress
depends on the unreasonable man.
-
aceforever
- Club4AG Pro
- Posts: 637
- Joined: Sun Jan 18, 2015 11:36 am
- Location: Seattle, WA, USA
Re: Restoring AE86 w/ 4AGE 16v + HKS ITB + Haltech E6X
The HKS Manifold runners are quite rough on the inside because of the casting, isn't this usually a bad thing since it creates turbulence inside the manifold?
Probably not worth it but a task for later down the road to sand it smooth?
Probably not worth it but a task for later down the road to sand it smooth?
Re: Restoring AE86 w/ 4AGE 16v + HKS ITB + Haltech E6X
A bit of surface roughness is typical of manifold castings, and does
not harm flow to any great extent due to the boundary layer effect.
But any ridges, lips, lumps or steps should be smoothed out.
Cheers... jondee86
not harm flow to any great extent due to the boundary layer effect.
But any ridges, lips, lumps or steps should be smoothed out.
Cheers... jondee86
The reasonable man adapts himself to the world; the unreasonable one
persists in trying to adapt the world to himself. Therefore, all progress
depends on the unreasonable man.
persists in trying to adapt the world to himself. Therefore, all progress
depends on the unreasonable man.
-
yoshimitsuspeed
- Club4AG MASTER
- Posts: 2084
- Joined: Sun Jan 13, 2013 1:18 pm
- Contact:
Re: Restoring AE86 w/ 4AGE 16v + HKS ITB + Haltech E6X
Yeah some roughness or texture on the intake has actually been shown to be a good thing.
-
aceforever
- Club4AG Pro
- Posts: 637
- Joined: Sun Jan 18, 2015 11:36 am
- Location: Seattle, WA, USA
Re: Restoring AE86 w/ 4AGE 16v + HKS ITB + Haltech E6X
yoshimitsuspeed wrote:Yeah some roughness or texture on the intake has actually been shown to be a good thing.
jondee86 wrote:A bit of surface roughness is typical of manifold castings, and does
not harm flow to any great extent due to the boundary layer effect.
But any ridges, lips, lumps or steps should be smoothed out.
Cheers... jondee86
How big should the roughness be? I see some bumps that are maybe 2mm in diameter.
I'm planning to do an oil change soon. Anything I should look out for in this car that has been sitting?
Standard procedure as I know it:
Put oil pan down, unscrew the bottom bolt on the sump, let it drain, change oil filter, put new oil filter in with some oil on the o-ring, screw the bolt back on, fill with new oil.
Is there anything I should do with the oil cooler? I assume there's going to be some dirty oil that's going to be there. Should I bother to flush that out? If so, how should I do that?
Thanks!
Re: Restoring AE86 w/ 4AGE 16v + HKS ITB + Haltech E6X
Surface roughness is a bit subjective... I just looked at a piece of
50 grit sandpaper, and I would consider that level of surface "unevenness"
to be quite accepatable on a cast manifold. If there are dags or pimples
on the surface, by all means smooth them down. But it is not necessary
to make all the internal surfaces perfectly smooth. Steps, ledges and
sharp changes of section/direction will be far more harmful to airflow.
Usually, it is best to change the oil shortly after the engine has been run.
By dropping the oil while it is still warm, there is a reasonable chance you
will get the crud from the bottom of the oil pan to drain out with the oil.
You won't have this opportunity, and after 8 years there WILL be crud in
the oil pan (unless the oil was changed immediately before it was parked
up). So best to do as you say, and then fill with cheap mineral oil. When
you get the engine fired up... run it until it gets warm, and then dump
the oil again. That should flush out most of the loose crud.
You will want to trickle a bit of fresh oil over the cams and buckets before
you try starting the engine, and prime the oiling system by cranking with
the plugs out and the injectors disabled. If you do this with the cam covers
off, you will see oil starting to ooze out around the cams to verify oil is
getting up to the top of the engine.
When you drop the oil for the first time, look to see if there is any water
in your drain tray, or any shiny metal flakes. Kind of like negative gold
panning... where you don't want to find any flakes
Cheers... jondee86
The reasonable man adapts himself to the world; the unreasonable one
persists in trying to adapt the world to himself. Therefore, all progress
depends on the unreasonable man.
persists in trying to adapt the world to himself. Therefore, all progress
depends on the unreasonable man.
-
aceforever
- Club4AG Pro
- Posts: 637
- Joined: Sun Jan 18, 2015 11:36 am
- Location: Seattle, WA, USA
Re: Restoring AE86 w/ 4AGE 16v + HKS ITB + Haltech E6X
Oh! Didn't know I should let the engine run first.
I guess I should focus on getting the electrical wiring done first so the engine actually runs? And sort see how the fuel pump is doing after.
You mentioned draining fuel from the tank, is there a bolt access to it as well? or would I need detach the lines somewhere and run the fuel pump?
I guess I should focus on getting the electrical wiring done first so the engine actually runs? And sort see how the fuel pump is doing after.
You mentioned draining fuel from the tank, is there a bolt access to it as well? or would I need detach the lines somewhere and run the fuel pump?
Re: Restoring AE86 w/ 4AGE 16v + HKS ITB + Haltech E6X
Apparently there is one of these drain plugs underneath the tank.

It appears that the square drive on a 3/8" drive rachet handle fits
the square hole, and should be able to loosen it for you (WD40).
The engine does not run without the fuel pump running, and the
fuel pump doesn't like running without fuel in the tank, as the pump
uses the fuel for cooling. So I would suggest that you see if you can
get the drain plug out. If what comes out contains sludge, leave the
plug out and drop a gallon of gas down the filler as fast as you can.
This should sluice any loose debris out. Plug it up, and put a couple
of gallons of fresh gas in the tank. Then try your pump. If it runs
you are in luck If it does not run then you are up for dropping
the tank and changing out the pump. Here is the procedure...
http://www.dorikaze.ca/dorikaze_guides_detail.php?a_id=5
I had to change a pump not so long ago (WD40 is your friend) and
instead of buying a ridiculously expensive pump from Toyota, I bought
a generic Chinese pump from an auction site for about 1/5th the price.
Needed a tiny amount of dremmeling to get the rubber base cushion
to fit correctly, but it worked fine.
Cheers... jondee86
It appears that the square drive on a 3/8" drive rachet handle fits
the square hole, and should be able to loosen it for you (WD40).
The engine does not run without the fuel pump running, and the
fuel pump doesn't like running without fuel in the tank, as the pump
uses the fuel for cooling. So I would suggest that you see if you can
get the drain plug out. If what comes out contains sludge, leave the
plug out and drop a gallon of gas down the filler as fast as you can.
This should sluice any loose debris out. Plug it up, and put a couple
of gallons of fresh gas in the tank. Then try your pump. If it runs
you are in luck
the tank and changing out the pump. Here is the procedure...
http://www.dorikaze.ca/dorikaze_guides_detail.php?a_id=5
I had to change a pump not so long ago (WD40 is your friend) and
instead of buying a ridiculously expensive pump from Toyota, I bought
a generic Chinese pump from an auction site for about 1/5th the price.
Needed a tiny amount of dremmeling to get the rubber base cushion
to fit correctly, but it worked fine.
Cheers... jondee86
The reasonable man adapts himself to the world; the unreasonable one
persists in trying to adapt the world to himself. Therefore, all progress
depends on the unreasonable man.
persists in trying to adapt the world to himself. Therefore, all progress
depends on the unreasonable man.
-
aceforever
- Club4AG Pro
- Posts: 637
- Joined: Sun Jan 18, 2015 11:36 am
- Location: Seattle, WA, USA
Re: Restoring AE86 w/ 4AGE 16v + HKS ITB + Haltech E6X
Thanks jondee86, I didn't get to check the tank over the weekend. I'll have to do it tonight.
Meanwhile during the day time, I'm working out some of the wiring. I managed to get the wiring diagram for a USDM 1986 model. It's helping a lot since the color codes are the same. I have a few questions:

Seems like the original injectors have a big resistor box. Based on some googling pictures, it looks like one of these that I have in the spare bin:

Would I need something like that for the Haltech wiring?
Looking at the previous owner's wiring it seems like directly connecting to a + and all - goes to the ECU directly.

The haltech's wiring diagram doesn't show a resistor as well

My guess is that since the OEM ECU only has two wires going to the pair of injectors, it needs that resistor?
Meanwhile during the day time, I'm working out some of the wiring. I managed to get the wiring diagram for a USDM 1986 model. It's helping a lot since the color codes are the same. I have a few questions:
Seems like the original injectors have a big resistor box. Based on some googling pictures, it looks like one of these that I have in the spare bin:
Would I need something like that for the Haltech wiring?
Looking at the previous owner's wiring it seems like directly connecting to a + and all - goes to the ECU directly.
The haltech's wiring diagram doesn't show a resistor as well
My guess is that since the OEM ECU only has two wires going to the pair of injectors, it needs that resistor?
 Re: Restoring AE86 w/ 4AGE 16v + HKS ITB + Haltech E6X
Injectors basically come in two types... high impedence (12-14 Ohms)
and low impedence (2-3 Ohms). The USDM AE86 had low impedence
injectors, and the resistor box is used to raise the circuit resistance
up to the equivalent of the high impedence injectors. This reduces the
load on the switching transistor in the factory ECU.
The Haltech has the capability to work with either type of injector
without the need for a resistor box. Therefore, you need to confirm
the impedence (resistance) of your injectors and select the correct
setting in the ECU software.Refer page 125 Appendix C of the Haltech
Manual for explanation.
The Haltech has four injector outputs and has the capability of running
sequential injection. To use this feature you need to wire the injectors
to the ECU outputs in a specific order so that the output sequence of the
ECU matches the firing order of the engine. Refer to the Manual for the
sequence details and the software settings.
The ECU pulses the injectors by momentarily switching them to ground.
The injectors are energised by a key-switched 12V power supply, which
in your case will come from the main power relay via a 10A fuse.
Cheers... jondee86
The reasonable man adapts himself to the world; the unreasonable one
persists in trying to adapt the world to himself. Therefore, all progress
depends on the unreasonable man.
persists in trying to adapt the world to himself. Therefore, all progress
depends on the unreasonable man.
-
aceforever
- Club4AG Pro
- Posts: 637
- Joined: Sun Jan 18, 2015 11:36 am
- Location: Seattle, WA, USA
Re: Restoring AE86 w/ 4AGE 16v + HKS ITB + Haltech E6X
Cool that explains it. How do you figure out what resistance the injectors are? with the multimeter?
So I out the fuel tank drain bolt out, and man, tons of fuel came out! I think about 3 gallons (11.3L) came out! I dripped some onto the garage floor, got kitty litter to soak up all of the fuel. But man that was a lot of work cleaning.
I took some and put it into a cup for a further inspection. Looks like fuel to me. What do you guys think? Click for larger picture

http://i.imgur.com/FLKUgLF.png
So I out the fuel tank drain bolt out, and man, tons of fuel came out! I think about 3 gallons (11.3L) came out! I dripped some onto the garage floor, got kitty litter to soak up all of the fuel. But man that was a lot of work cleaning.
I took some and put it into a cup for a further inspection. Looks like fuel to me. What do you guys think? Click for larger picture
http://i.imgur.com/FLKUgLF.png
Re: Restoring AE86 w/ 4AGE 16v + HKS ITB + Haltech E6X
Yes... check the resistance of the injectors with your multimeter.
If all the gas that came out of the tank was as clean as that sample,
and there was no sediment, you are good Use the old gas in your
lawnmower or for killing weeds, and put 2 or 3 gallons of fresh gas
in the tank. That will make sure there is gas available to the pump
when your power it up.
Cheers... jondee86
If all the gas that came out of the tank was as clean as that sample,
and there was no sediment, you are good
lawnmower or for killing weeds, and put 2 or 3 gallons of fresh gas
in the tank. That will make sure there is gas available to the pump
when your power it up.
Cheers... jondee86
The reasonable man adapts himself to the world; the unreasonable one
persists in trying to adapt the world to himself. Therefore, all progress
depends on the unreasonable man.
persists in trying to adapt the world to himself. Therefore, all progress
depends on the unreasonable man.
-
aceforever
- Club4AG Pro
- Posts: 637
- Joined: Sun Jan 18, 2015 11:36 am
- Location: Seattle, WA, USA
Re: Restoring AE86 w/ 4AGE 16v + HKS ITB + Haltech E6X
jondee86 wrote:Injectors basically come in two types... high impedence (12-14 Ohms)
and low impedence (2-3 Ohms). The USDM AE86 had low impedence
injectors, and the resistor box is used to raise the circuit resistance
up to the equivalent of the high impedence injectors. This reduces the
load on the switching transistor in the factory ECU.
I just measured the injectors and they are 2.8-2.9 Ohms. So I guess they are low impedance injectors.
jondee86 wrote:If all the gas that came out of the tank was as clean as that sample,
and there was no sediment, you are good
lawnmower or for killing weeds, and put 2 or 3 gallons of fresh gas
in the tank. That will make sure there is gas available to the pump
when your power it up.
Great, I'm probably going to just dump it at the nearest hazardous waste facility as I don't have a lawnmower.
-----
Now that the injectors are out of the way. I'm trying to figure out how the ignition and coil packs.
What came in the spare parts bin is a drum with a red hat that I assume goes to the distributor cap. and a controller device of some sort.

One side of the controller's wiring is cut:

Close up of the controller says Bx and 041

-----
There's also another controller that says Cx and 51

No cut wires on this one.

----
I'm not familiar with coil / ignitor components and I'm not sure what the difference between the two are.
Looking at the EFI wire diagram it seems like the stock ECU connected up to the Igniter (which is what I'm guessing what's in the controller box). What's the cut wires? and what's the bigger connector plug? Of course I'm thinking this diagram probably is missing some wiring, since there are way more wires coming out of the controller box than shown.

The Haltech diagram shows these:

However upon reading the Haltech manual, it seems I don't need to wire all of it up since I'm using the distributor. Only Ign #1 is used for ignition output for the coil and it should connect to the ignition module (controller box above?)
Hope I can get some more insight on this.
Thanks!
Re: Restoring AE86 w/ 4AGE 16v + HKS ITB + Haltech E6X
Considering what you need to run with the Haltech...
The coil (round drum with a red hat) and igniter (black box) both
get key-switched 12V. The igniter gets a low level (5V) IGt signal
from the ECU to tell it when to trigger and momentarily ground the
negative side of the coil. The igniter grounds thru its outer casing
so it is important that it be bolted down. Kind of like this...

I'm not sure if the igniter needs a NE signal or not ? Probably not,
as the ECU will be getting the NE (rpm) signal from the distributor
and sending the IGt signal to the igniter, which should keep it
happy. But Toyota did some weird s**t in those igniters, and it
looks like you have AW11 MR2 versions there. You will have to try
and figure out which wires are which as I don't have a diagram
that gets anywhere close to those colors.
Cheers... jondee86
The coil (round drum with a red hat) and igniter (black box) both
get key-switched 12V. The igniter gets a low level (5V) IGt signal
from the ECU to tell it when to trigger and momentarily ground the
negative side of the coil. The igniter grounds thru its outer casing
so it is important that it be bolted down. Kind of like this...
I'm not sure if the igniter needs a NE signal or not ? Probably not,
as the ECU will be getting the NE (rpm) signal from the distributor
and sending the IGt signal to the igniter, which should keep it
happy. But Toyota did some weird s**t in those igniters, and it
looks like you have AW11 MR2 versions there. You will have to try
and figure out which wires are which as I don't have a diagram
that gets anywhere close to those colors.
Cheers... jondee86
The reasonable man adapts himself to the world; the unreasonable one
persists in trying to adapt the world to himself. Therefore, all progress
depends on the unreasonable man.
persists in trying to adapt the world to himself. Therefore, all progress
depends on the unreasonable man.
Re: Restoring AE86 w/ 4AGE 16v + HKS ITB + Haltech E6X
Just thinking about this for a moment, you would probably be better off
just ditching the Toyota igniter and grabbing some "dumb" igniter from
the junkyard. Make sure you get the plug and a bit of the wiring as well.
Easier than trying to figure out what color wire connects here or there !!!

This is a two-channel igniter from a Subaru turbo wagon, but similar items
can be found on many other cars. You only need a single channel as you are
only using a single coil, but if you get a two-channel igniter you can easily
upgrade to wasted spark at a later date. The beauty of this igniter is that
the connections are identified on the casing. Because you are using the
Haltech, you only need...
IB1 = low level IGt input from ECU
OC1 = coil trigger output (connects to coil negative)
G = Ground
And maybe...
VB = battery voltage (key-switched 12V supply, required on some igniters)
Look for cars that run coil packs and a cam angle sensor instead of a distributor,
and see what you can find.
Cheers... jondee86
just ditching the Toyota igniter and grabbing some "dumb" igniter from
the junkyard. Make sure you get the plug and a bit of the wiring as well.
Easier than trying to figure out what color wire connects here or there !!!
This is a two-channel igniter from a Subaru turbo wagon, but similar items
can be found on many other cars. You only need a single channel as you are
only using a single coil, but if you get a two-channel igniter you can easily
upgrade to wasted spark at a later date. The beauty of this igniter is that
the connections are identified on the casing. Because you are using the
Haltech, you only need...
IB1 = low level IGt input from ECU
OC1 = coil trigger output (connects to coil negative)
G = Ground
And maybe...
VB = battery voltage (key-switched 12V supply, required on some igniters)
Look for cars that run coil packs and a cam angle sensor instead of a distributor,
and see what you can find.
Cheers... jondee86
The reasonable man adapts himself to the world; the unreasonable one
persists in trying to adapt the world to himself. Therefore, all progress
depends on the unreasonable man.
persists in trying to adapt the world to himself. Therefore, all progress
depends on the unreasonable man.
-
aceforever
- Club4AG Pro
- Posts: 637
- Joined: Sun Jan 18, 2015 11:36 am
- Location: Seattle, WA, USA
Re: Restoring AE86 w/ 4AGE 16v + HKS ITB + Haltech E6X
Why can't I use the MR2 ignitor? Just the wiring is hard to trace right?
-
aceforever
- Club4AG Pro
- Posts: 637
- Joined: Sun Jan 18, 2015 11:36 am
- Location: Seattle, WA, USA
Re: Restoring AE86 w/ 4AGE 16v + HKS ITB + Haltech E6X
Seems like on the ae86 efi diagram the ignitor connects to the tachometer. Does this mean that my current stock tachometer won't work without the ignitor?
-
aceforever
- Club4AG Pro
- Posts: 637
- Joined: Sun Jan 18, 2015 11:36 am
- Location: Seattle, WA, USA
Re: Restoring AE86 w/ 4AGE 16v + HKS ITB + Haltech E6X
Good news! I figured out the wiring diagram!
Luckily the engine harness plug that was plugged into the igniter matches the AE86 EFI diagram. I followed the wires and it looks the same as the diagram you had provided.
I read on other places that AW11 MR2 coilpacks are also usable with AE86s. (is this right?)
So, all I need to wire up is IGN +12V, IGT (from haltech IGN 1) right?
There's another pair of wires coming from the igniter that is shielded. No clue what that is and can't find any information about it at the moment.
Re: Restoring AE86 w/ 4AGE 16v + HKS ITB + Haltech E6X
aceforever wrote:Why can't I use the MR2 ignitor? Just the wiring is hard to trace right?
That, and the fact that Toyota had a couple of different ignition strategies
at the time, and some igniters had different features from others. As you
are not using the Toyota ECU, you will not have Ne or IGf available to the
igniter to ensure correct function, should the igniter require these signals.
In addition, the Toyota igniters are "smart" igniters, which means that dwell
is controlled by the igniter rather than the ECU. You will save yourself a lot of
pain and tears by either buying a new "dumb" Bosch igniter or similar, or
getting something from the junkyard.

This is a typical wiring diagram for a readily available dumb Bosch igniter.
This particular model requires 12V input but some other models don't...
it is not a biggie.
Cheers... jondee86
The reasonable man adapts himself to the world; the unreasonable one
persists in trying to adapt the world to himself. Therefore, all progress
depends on the unreasonable man.
persists in trying to adapt the world to himself. Therefore, all progress
depends on the unreasonable man.